Upgrading from v5.2 or v5.2.x to v5.2.4
This section discusses how you can upgrade from Adeptia Automate v5.2, v5.2.1 or v5.2.3 to v5.2.4.
Pre-upgrade configurations
Step 1 — Perform the following pre-upgrade tasks
- Ensure that no Process Flows or Templates/Automations are in queued or running state.
- Deactivate the dedicated deployments (if any).
- Scale down the following microservice deployments:
api-publisher-gatewayeventlistenerruntime
Step 2 — Update the values.yaml file
-
Go to the Adeptia Automate ArtifcatHUB page for Adeptia Automate v5.2.4. https://artifacthub.io/packages/helm/adeptia-automate/adeptia-connect/5.2.4
-
Click DEFAULT VALUES.
-
On the Default values screen, click the
 (download) icon to download the global
 values.yamlfile for Adeptia Automate v5.2.4. -
In the global
values.yaml, update the following configurations:- Image Pull Secret
- Database credentials
- Docker image URLs as per the repository (applicable if you are using a private repository to host the Adeptia Docker images)
-
Set the value of the
ipfamilyproperty under theglobal > configsection in thevalues.yamlfile toipv6if your cluster supports the IPv6 protocol. IPv4 is supported by default. -
Set the values for the following variables as mentioned in the table below: | Variable | Section in values.yaml | Value | | --- | --- | --- | |
EXECUTE_STATIC_JOB|global > static|true| |EXECUTE_MIGRATION_JOB|global > migration|true| |EXECUTE_CLEANUP_JOB|global > cleanup|false| -
If you are switching from HA mode of RabbitMQ to non-HA mode or vice-versa, ensure that the values for the following variables under the
global > cleanupsection of thevalues.yamlfile are set to true to delete the existing RabbitMQ resources before the upgrade.
Ensure that there are no messages in running or queued state before proceeding.
| Variable | Description |
|---|---|
EXECUTE_CLEANUP_JOB | Set to true to enable the cleanup job. |
DELETE_RABBITMQ_STATEFULSET | Set to true to remove the existing RabbitMQ StatefulSet. |
DELETE_RABBITMQ_PVC | Set to true to remove the existing RabbitMQ Persistent Volume Claims. |
DELETE_RABBITMQ_Cluster | Set to true to remove the existing RabbitMQ Cluster resources. |
DELETE_RABBITMQ_CONFIG_SECRET | Set to true to remove the existing RabbitMQ configuration secret. |
-
In the following sections of the
values.yamlfile, set the username and password for enabling authentication to download heap dumps. To authenticate using these credentials, ensure that the createparameter in these sections is set to true:-
global > webappGateway > customActuatorSecrets -
global > apigateway > customActuatorSecretsIf you do not want to specify credentials for enabling authentication to download heap dumps, set create to false and provide your secret name in the secretName parameter in the above sections. Refer to the table below for details:Parameter Description create Determines whether the Helm chart creates a Secret in the target namespace. Set to true (default) for Helm to create the Secret from the username and password you provide. Set to false if you want the pods to reference an existing Secret created outside Helm — for example, by HashiCorp Vault, External Secrets Operator, a CI/CD pipeline, or a platform-managed Kubernetes Secret. secretName The name of the Kubernetes Secret that stores the credentials. Pods refer to this Secret for authentication.
-
-
Ensure that all the remaining settings in the
values.yamlfile, except those discussed in this guide, remain as per the previous configuration.
Upgrading to v5.2.4
- Add the Helm repo:
Code
helm repo add <Repo name> https://adeptia.github.io/adeptia-automate-helm-package/charts/
- Update the application Helm repository:
Code
helm repo update
- Upgrade the application:
Code
helm upgrade -i <Release name> <Repo name>/adeptia-connect --version 5.2.4 -f <Path of the values.yaml> -n <Namespace>
Post-upgrade steps
Follow the post-upgrade steps given below:
- Scale up the microservice deployments that were scaled down before the upgrade.
- Reactivate the dedicated deployments that were deactivated before the upgrade.
- Execute the following query in the log database:
Code
CREATE INDEX IDX_AU_RULE_RESULTS_BRE_ID
ON AU_RULE_RESULTS (AU_BUSINESSRULE_EXECUTION_ID);

CREATE INDEX IDX_AU_RULE_EXEC_BRE_ID
ON AU_RULE_EXECUTIONS (AU_BUSINESSRULE_EXECUTION_ID);
-
Open the agent deployment by running the command in the following format:
kubectl edit deployment <Name of the deployment for the agent microservice> -n <Namespace where you have deployed the application>
-
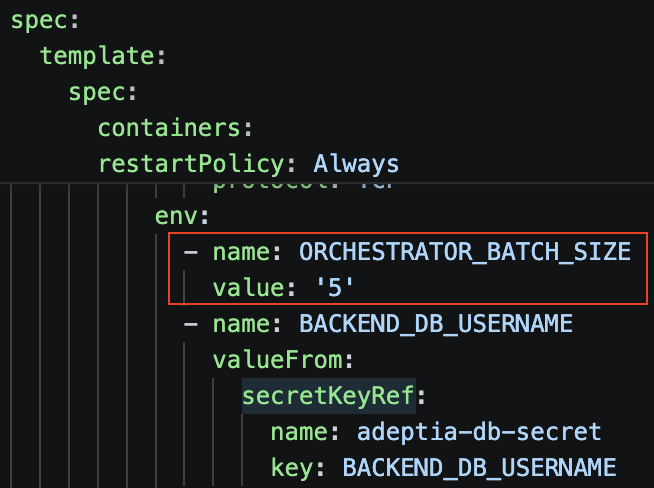
On the deployment that opens, add the variable ORCHESTRATOR_BATCH_SIZE and set its value to '5' as shown in the screenshot below:
Steps 6 through 9 are optional. Skip them if they were already completed during a previous version's setup, or if you do not wish to deploy the Amazon DynamoDB CData driver. -
Download and Deploy the Amazon DynamoDB CData driver.
-
After you deploy the database driver, ensure that the Amazon DynamoDB driver is present at Configurations > Setup > Account > Database Driver.
-
If you are using connection pooling in the Database Info activity for databases other than MySQL, Oracle, SQL Server, and PostgreSQL, you need to verify that the driver JAR is present in Configurations > Setup > Custom Libraries > Ext. Additionally, ensure that a validation query compatible with the driver is set in the
abpm.database.validationQueryproperty under Settings > Application Settings > Common > Database Connection.For example, in the case of Redshift, ensure that the Ext folder contains the
redshift-jdbc42-<version>.jarfile and that the property is set toSELECT 1. -
If you have performed step 8, you need to restart the following services:
- Event
- Webrunner
- Runtime