Setting up Adeptia AI Service on Azure
Upgrading to Adeptia Automate v5.2 alone is not sufficient to use the AI features available in the product. The AI features require a separate Azure-based infrastructure to be set up and configured. This infrastructure is referred to as the Azure AI Service.
The Azure AI Service acts as the backend AI engine for Adeptia Automate. It receives requests from the Adeptia application, processes them using Azure's AI services, and returns the results. Without this setup, the AI features in Adeptia Automate will not function.
This setup is required to use the following features:
- AI Assistant
- Knowledge Base
- AIMap (AI Mapping Suggestions)
- AI Business Rules
- Data Extraction (IDP)
- Data Mapping Agent
 | This setup is not required for the Observe feature, which has its own independent deployment and LLM configuration. For details, see Deploying Adeptia Automate MCP and Observe. |
|---|
2. Architecture
The following diagram shows how the Adeptia application connects to the Azure AI Service and how the Azure AI Service connects to the underlying AI components:
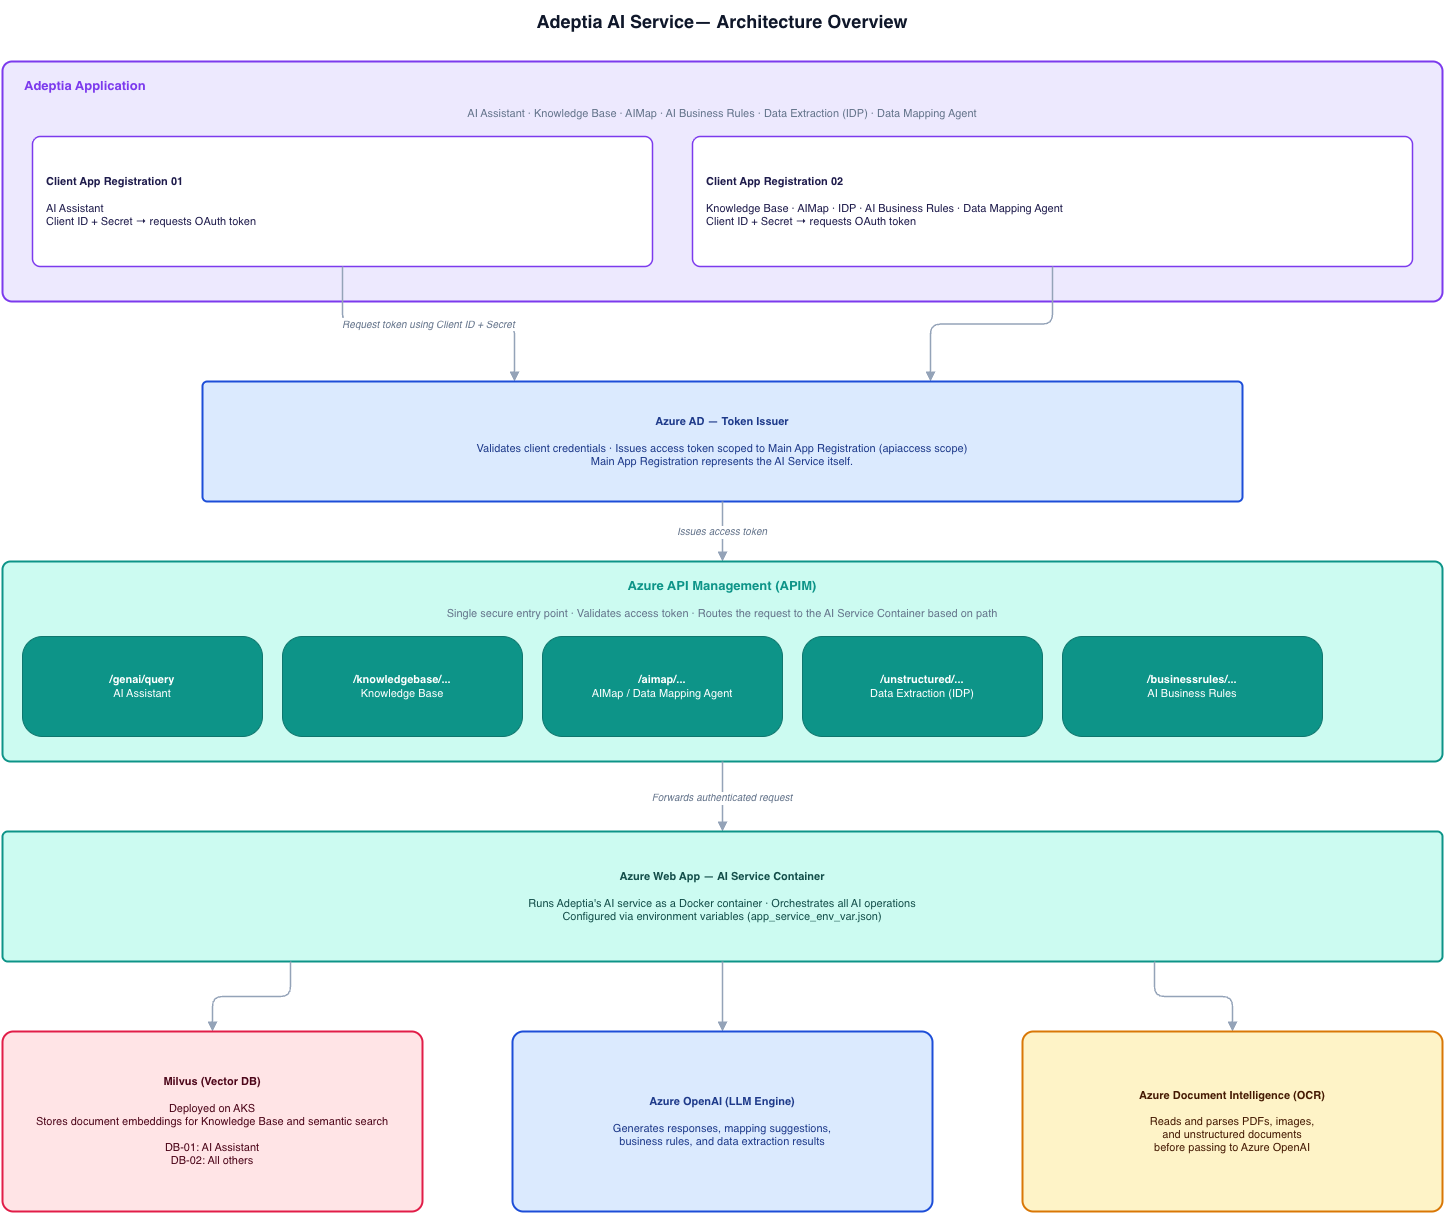
Key Components
Azure AD App Registrations
Two client app registrations act as identity cards for the Adeptia application when calling the AI APIs. One is dedicated to AI Assistant and the other serves all remaining AI features. A separate main app registration represents the AI Service itself and defines the API boundary that APIM protects.
Azure API Management (APIM)
The single, secure entry point for all AI API calls from the Adeptia application. It validates identity tokens, enforces access control, and routes requests to the correct backend based on the request path.
Azure Web App (AI Service Container)
Runs Adeptia's AI service as a Docker container. This is the core processing layer that receives requests from APIM and orchestrates the interactions with Milvus, Azure OpenAI, and Azure Document Intelligence to produce results.
Milvus Vector Database
Stores document embeddings (numerical representations of text) generated by Azure OpenAI. When a user queries the Knowledge Base or uses an AI feature, Milvus finds the most semantically relevant content to pass to Azure OpenAI for generating a response. Deployed on AKS.
Azure OpenAI
The LLM engine that powers all AI responses — answers to knowledge base queries, mapping suggestions, business rule generation, and data extraction results.
Azure Document Intelligence
Performs OCR to read and parse PDFs, images, and unstructured documents before their content is processed by Azure OpenAI.
3. Prerequisites
Ensure the following are available before proceeding:
| Requirement | Details |
|---|---|
| API Management (APIM) | An existing Azure APIM instance |
| Azure Web App | An Azure Web App to host the AI service container |
| Azure OpenAI | An Azure OpenAI resource with all required models deployed |
| Azure AI Document Intelligence | An Azure AI Document Intelligence resource |
| AKS Cluster | A Kubernetes cluster for deploying Milvus |
| Azure AD access | Permissions to create App Registrations in Azure AD |
| Configuration repository access | Access to the Adeptia AI Service configuration repository containing milvus-values.yaml, apim_rule.json, inbound_processing_rule.xml, and app_service_env_var.json |
4. Setup Steps
Step 1 — Deploy Milvus Vector Database
Milvus is used for vector storage and semantic search. Deploy it on AKS using Helm with the milvus-values.yaml configuration file from the Adeptia configuration repository.
Run the following commands to deploy Milvus:
Code
helm repo add milvus https://milvus-io.github.io/milvus-helm/
Code
helm repo update
Code
helm install milvus-vector-database milvus/milvus -f milvus-values.yaml -n milvus --debug --timeout 30m --version 4.0.31
After deployment, access the Milvus UI (Attu) at:
| You can get the Attu IP from the Milvus services in your Kubernetes cluster. |
|---|
Code
http://<Attu-IP>:3000
| Field | Default Value |
|---|---|
| Username | root |
| Password | Milvus |
 | Change the default credentials immediately after first login. |
|---|
Step 2 — Create App Registrations
Three app registrations are required in Azure AD:
- Two client app registrations — one for AI Assistant, one for all other AI features (Knowledge Base, AIMap, IDP, AI Business Rules, Data Mapping Agent). These represent the Adeptia application and are used to obtain access tokens for calling the AI APIs.
- One main app registration — represents the AI Service itself and defines the API boundary that APIM enforces.
| Create the client app registrations first, since their IDs are needed when authorizing the main app's exposed API. |
|---|
Step 2.1 — Create Client App Registrations
Create the following two app registrations in Azure AD:
Code
<clientname>-aiservice-client-appreg-01
Code
<clientname>-aiservice-client-appreg-02
After creating each registration, generate a client secret.
- Go to Certificates & secrets → New client secret.
- Set expiry to 24 months.
- Copy and securely store the secret Value — it is required in later steps.
Step 2.2 — Create the Main App Registration
Create the third app registration:
Code
<clientname>-aiservice-main-appreg
Step 2.3 — Expose an API and Add a Scope
The main app registration must expose an API scope. This scope defines what the client app registrations are allowed to access, and APIM uses it to validate incoming tokens.
-
Open the main app registration and navigate to Expose an API.
-
Click Add a scope.
-
When prompted to set an Application ID URI, click Save and continue.
-
Fill in the scope fields as follows:
Field Value Scope name apiaccessWho can consent? Admins and users Admin consent display name apiaccessAdmin consent description apiaccessUser consent display name (leave empty) User consent description (leave empty) State Enabled -
Click Add scope to save.
Step 2.4 — Authorize the Client Applications
- Still in Expose an API, scroll down to Authorized client applications.
- Click Add a client application.
- Enter the Application (client) ID of the first client app registration.
- Check the box next to the
apiaccessscope. - Click Add application to save.
- Repeat steps 2–5 for the second client app registration.
Step 3 — Configure Network Connectivity
Configure the following network settings in Azure to ensure secure communication between all components.
Step 3.1 — API Management (APIM)
APIM is not deployed with VNet integration, therefore IP-based restriction is required.
- Whitelist the AKS outbound IP in the APIM inbound policy.
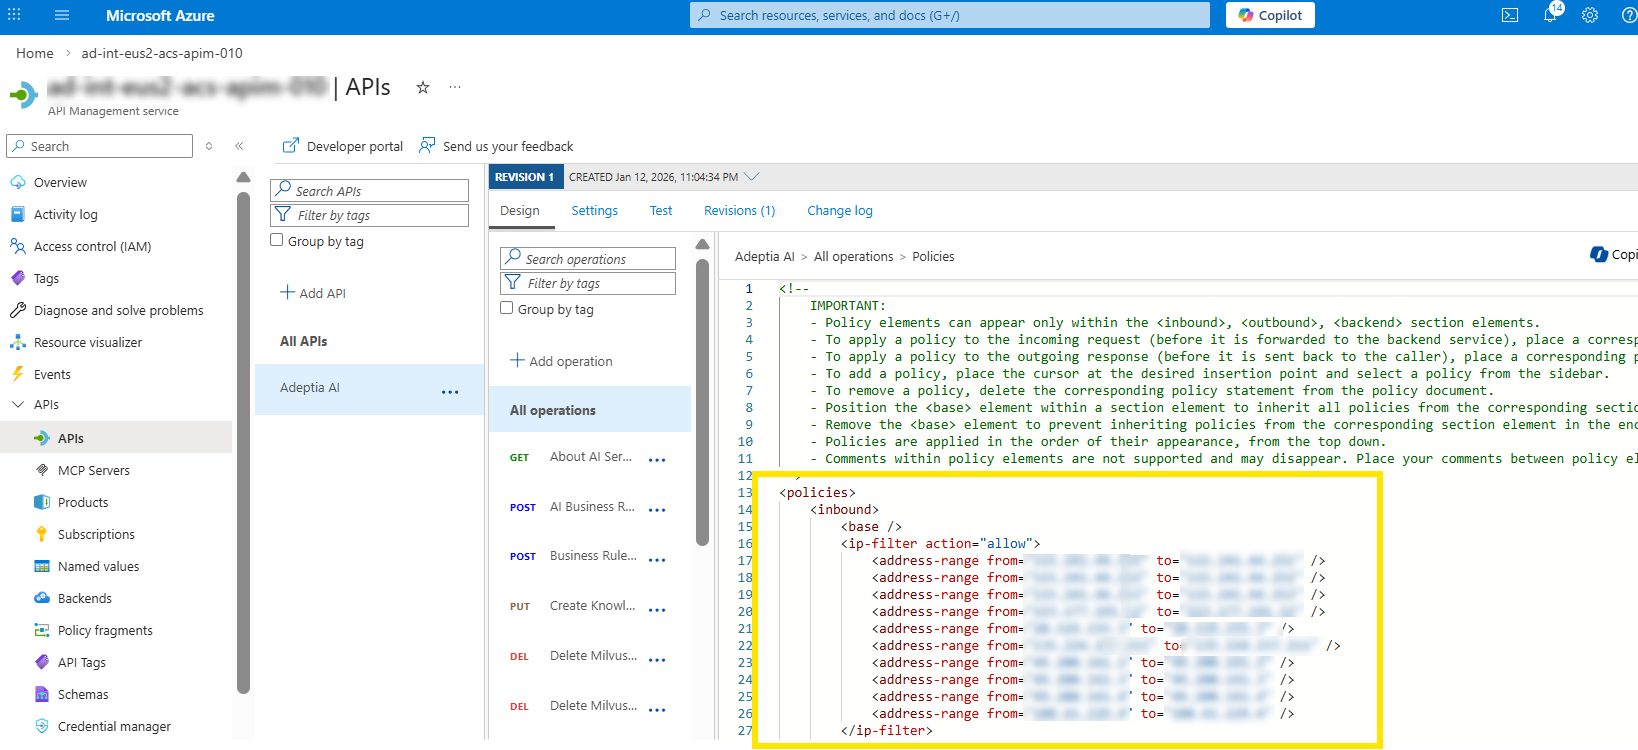
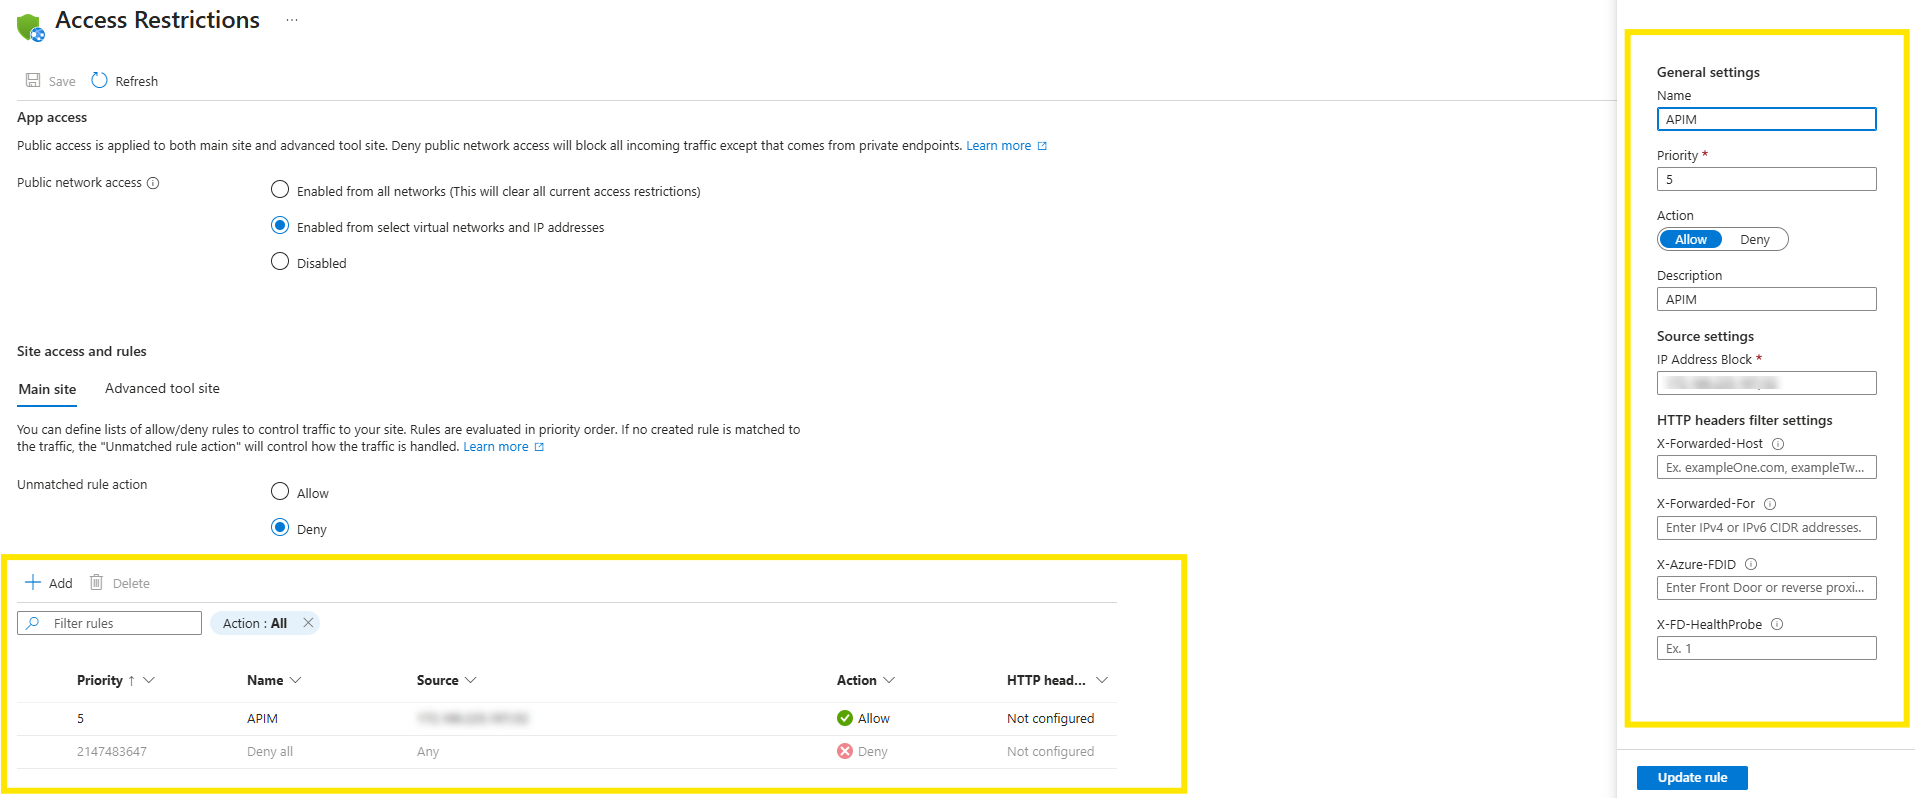
Step 3.2 — Azure Web App — Inbound
- Allow traffic only from APIM.
- Add the APIM Public IP in the Web App Access Restrictions.
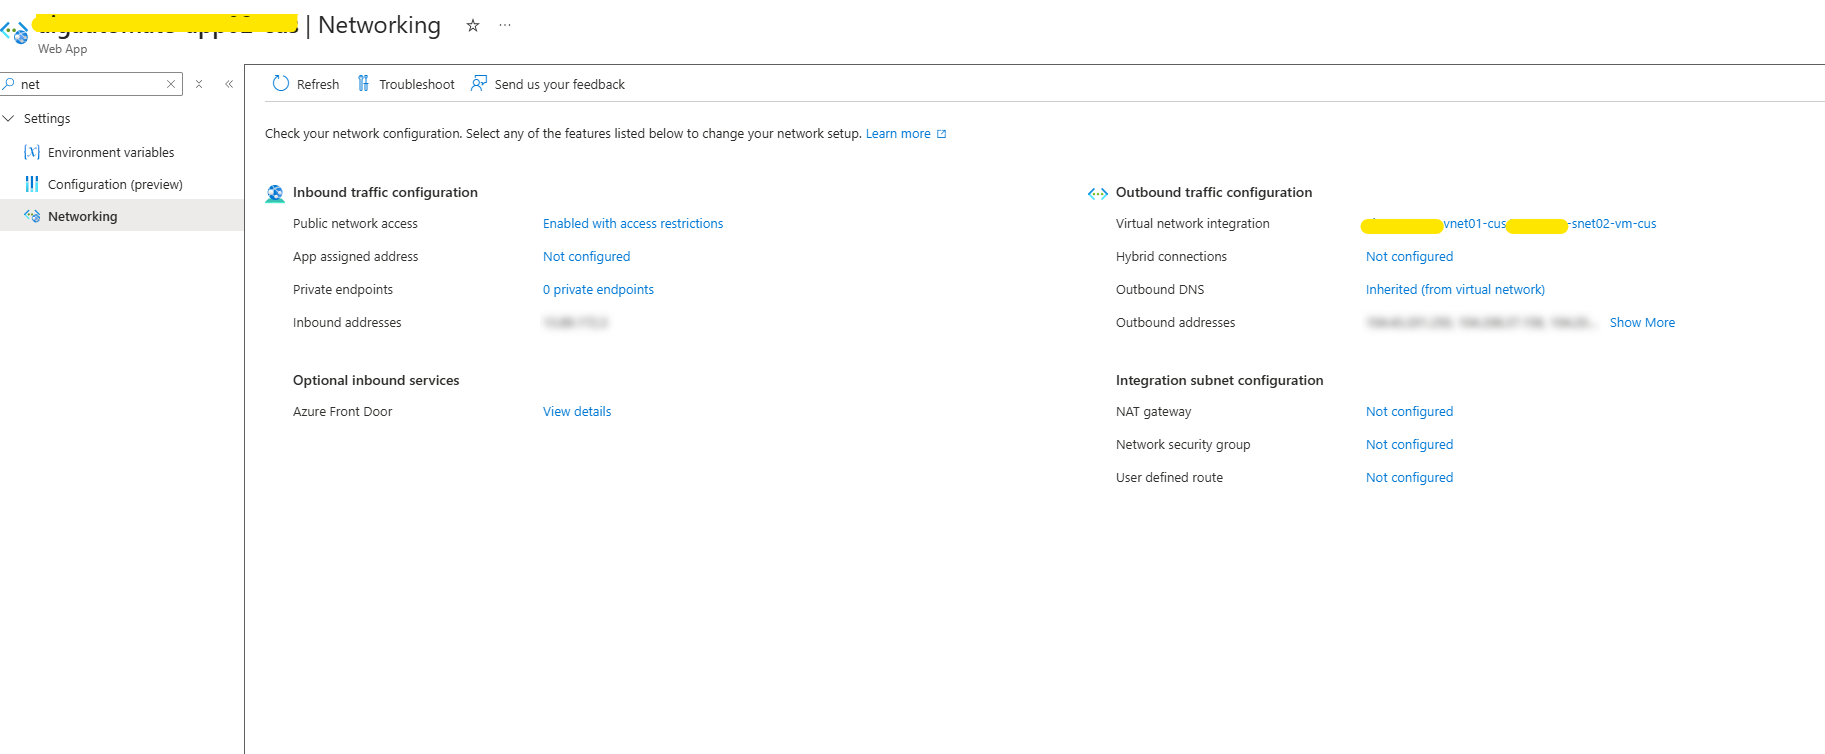
Step 3.3 — Azure Web App — Outbound
- Web App outbound traffic must be VNet integrated.
Step 3.4 — Azure AI Document Intelligence and Azure OpenAI
Both services must have:
- VNet integration enabled.
- Integration with the Web App subnet.
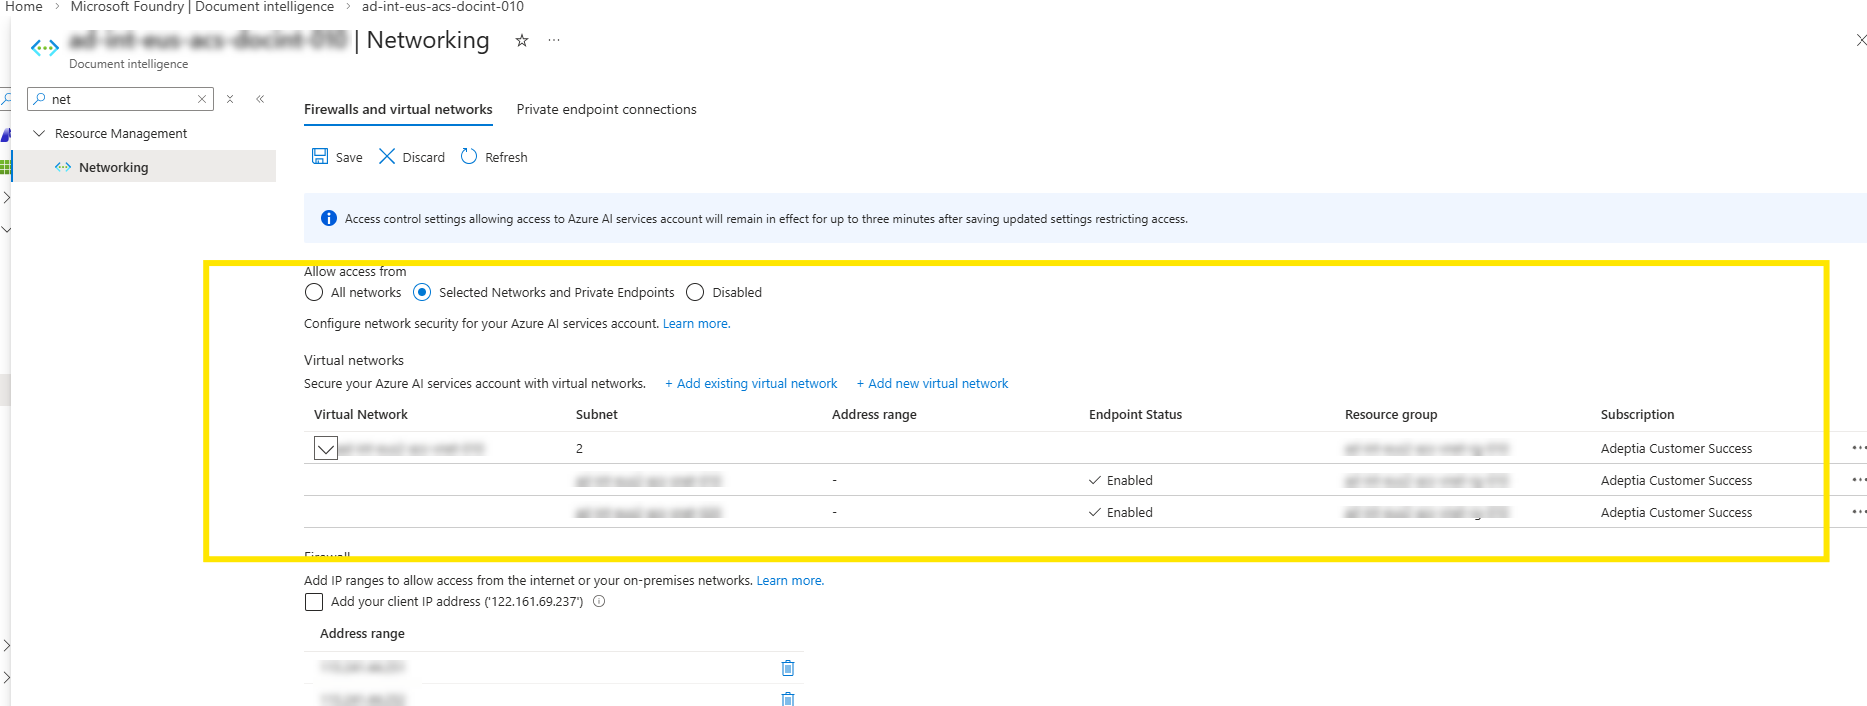
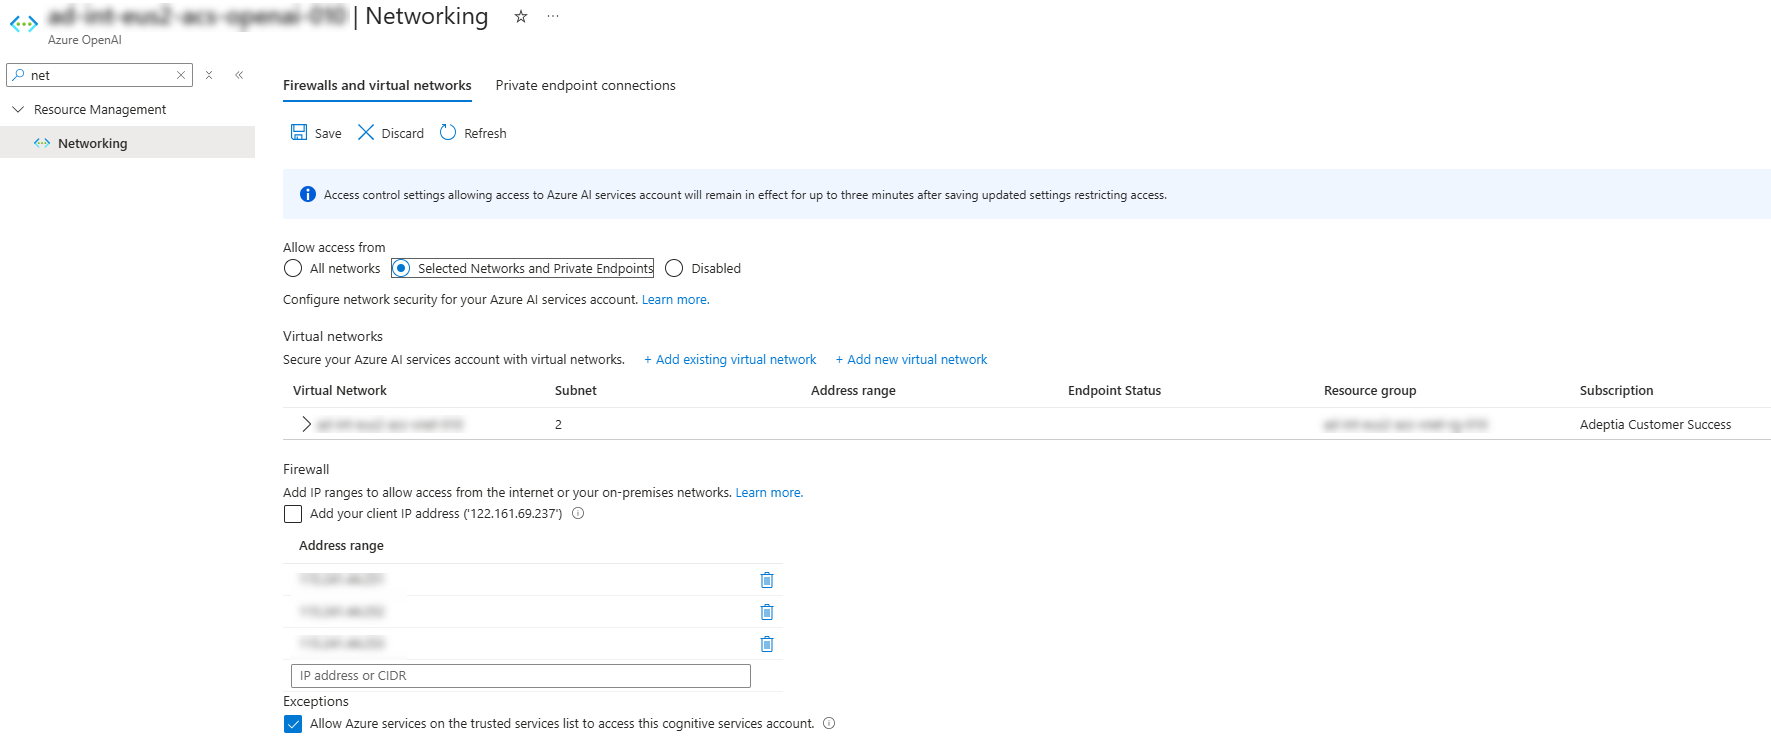
Step 3.5 — Azure OpenAI
- VNet integration enabled.
- Integration with the Web App subnet.
Step 4 — Configure APIs in API Management
-
Open the Azure Portal and navigate to your APIM instance.
-
Go to APIs in the left pane and click Add API.
-
Under Create from definition, select OpenAPI.
-
Download the
apim_rule.jsonfile from the Adeptia configuration repository. -
Before importing, open the file and update the
servers[0].urlvalue:- Replace
https​://<api_endpoint_url>/v1.0with your actual Azure Web App URL.
- Replace
-
Upload the updated file to APIM.
-
After import, verify that the backend URL in APIM points to your Azure Web App.
-
Navigate to APIs → Adeptia AI → All Operations → Design → Inbound processing.
-
Paste the policy from the
inbound_processing_rule.xmlfile from the Adeptia configuration repository. -
Before saving, replace the following placeholders in the policy:
Placeholder Value source <AKS-OUTBOUND-IP>AKS cluster outbound public IP <TENANT-ID>Azure AD Tenant ID <MAIN-APP-REG-CLIENT-ID>Application (client) ID of the main app registration (Step 2.2) <APP-SERVICE-URL>Azure Web App hostname <CLIENT-APP-REG-CLIENT-ID>Application (client) ID of either client app registration (Step 2.1)
Step 5 — Deploy AI Service Container
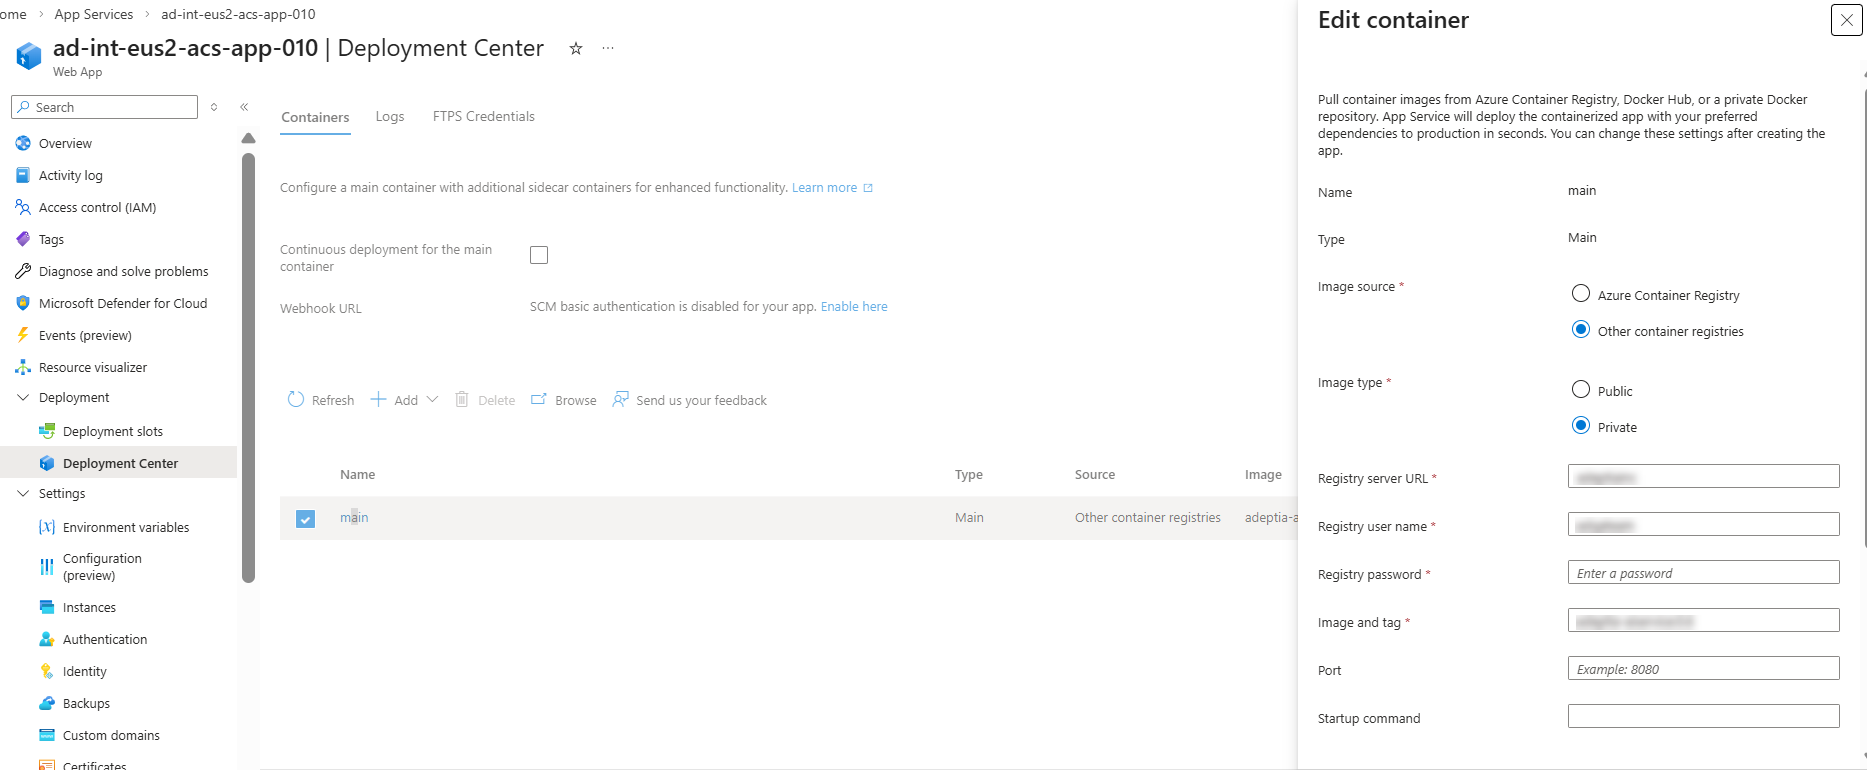
Deploy the AI service Docker image to the Azure Web App.
- Open the Azure Portal and navigate to your Azure Web App.
- Go to Deployment -> Deployment Center
- Enter the Container details in the Edit container panel on the right.
 | Field | Description |
| --- | --- |
| Name | The name assigned to this container instance. Keep the default value
| Field | Description |
| --- | --- |
| Name | The name assigned to this container instance. Keep the default value mainas it identifies this as the primary container for the web app. | | Type | Indicates whether this is a main or sidecar container. This is set automatically — no action required. | | Image source | The registry from which the Docker image will be pulled. Select Azure Container Registry if your image is hosted in ACR, or Other container registries if you are using a private Docker registry. | | Image type | Specifies whether the container image is publicly or privately accessible. Select Private since the Adeptia AI service image requires authentication credentials to access. | | Registry server URL | The URL of the container registry where the Adeptia AI service image is hosted. This will be provided to you as part of the Adeptia deployment package. | | Registry user name | The username required to authenticate with the container registry. This will be provided to you as part of the Adeptia deployment package. | | Registry password | The password corresponding to the registry username. This will be provided to you as part of the Adeptia deployment package. Enter it securely and do not share it. | | Image and tag | The name and version of the Docker image to deploy. Enter the image name and version tag exactly as provided in the Adeptia deployment package, for exampleadeptia-aiservice:<version>. | - Click Save.
Step 6 — Configure Environment Variables
The AI Service Container (Azure Web App) requires environment variables to connect to Azure OpenAI, Milvus, and Azure Document Intelligence. These are configured using the app_service_env_var.json file from the Adeptia configuration repository.
Replace every placeholder (shown in <angle-brackets>) in the file with your environment-specific values using the reference table below, then import the file into the Azure Web App via Configuration → Advanced edit.
| Placeholder | Where to find it |
|---|---|
<AKS-OUTBOUND-IP> | AKS cluster outbound public IP |
<TENANT-ID> | Azure AD Tenant ID |
<MAIN-APP-REG-CLIENT-ID> | Application (client) ID of the main app registration (Step 2.2) |
<APP-SERVICE-URL> | Azure Web App hostname |
<CLIENT-APP-REG-CLIENT-ID> | Application (client) ID of either client app registration (Step 2.1) |
<appinsights-instrumentation-key> | Azure Application Insights → Overview → Instrumentation Key |
<appinsights-applicationid> | Azure Application Insights → Overview → Application ID |
<docker-registry-server-username> | Azure Container Registry → Access keys → Username |
<langchain-api-key> | LangSmith account → API Keys |
<openai-api-key> | Azure OpenAI → Keys and Endpoint → Key 1 or Key 2 |
<openai_url> | Azure OpenAI → Keys and Endpoint → Endpoint (hostname only, no https://) |
<milvus-host> | AKS → Services → milvus-vector-database LoadBalancer IP |
<milvus-username> | Milvus Attu UI — set after first login (Step 1) |
<milvus-password> | Milvus Attu UI — set after first login (Step 1) |
<document_intelligence> | Azure AI Document Intelligence → Keys and Endpoint → Endpoint (hostname only) |
Step 7 — Configure Milvus Databases
Log in to Milvus via the Attu URL and create two new databases — one for each client app registration created in Step 2.1. The databases store the vector embeddings for each product's AI features separately.
Use the client app registration ID as the database name, following these rules:
- Replace all hyphens (
-) with underscores (_) in the ID. - Ensure the database name starts with an underscore (
_).
For example: _d74e2859_8a58_46e_8a84_428a2746d9c6
Step 8 — Configure the Adeptia Application
After completing the Azure AI Service setup, configure the application-side properties in Adeptia Automate by navigating to Settings > Application Settings > Common. These properties connect each AI feature in the Adeptia application to the APIM endpoint set up in the previous steps.
| The endpoint URL and OAuth properties for all features must point to the same APIM instance set up in Step 4. The only difference between features is the client ID and client secret — AI Assistant uses Client App Reg - 01, while all other features use Client App Reg - 02. |
|---|
AI Assistant
| Property | Description | Value |
|---|---|---|
abpm.services.chatbot.adeptiaai.enable | Enables the AI Assistant feature. | true |
abpm.services.chatbot.adeptiaai.endpoint | The APIM endpoint URL for the AI Assistant. | Your APIM URL (e.g., https​://<apim-name>.azure-api.net/v1.0) |
abpm.services.chatbot.adeptiaai.oauth.clientid | Client ID of Client App Reg - 01 (Step 2.1). | Application (client) ID of Client App Reg - 01 |
abpm.services.chatbot.adeptiaai.oauth.clientsecret | Client secret of Client App Reg - 01 (Step 2.1). | Secret value from Client App Reg - 01 |
abpm.services.chatbot.adeptiaai.oauth.scope | OAuth scope for the access token. | api://<MAIN-APP-REG-CLIENT-ID>/.default |
abpm.services.chatbot.adeptiaai.oauth.tokenurl | Token URL for OAuth authentication. | https://login.microsoftonline.com/<TENANT-ID>/oauth2/v2.0/token |
abpm.services.chatbot.adeptiaai.tagname | Tag name bound to the endpoint. | ProductDocumentation |
Knowledge Base
| Property | Description | Value |
|---|---|---|
abpm.services.knowledgebase.adeptiaai.enable | Enables the Knowledge Base feature. | true |
abpm.services.knowledgebase.adeptiaai.endpoint | The APIM endpoint URL for the Knowledge Base. | Your APIM URL (e.g., https​://<apim-name>.azure-api.net/v1.0) |
abpm.services.knowledgebase.adeptiaai.oauth.clientid | Client ID of Client App Reg - 02 (Step 2.1). | Application (client) ID of Client App Reg - 02 |
abpm.services.knowledgebase.adeptiaai.oauth.clientsecret | Client secret of Client App Reg - 02 (Step 2.1). | Secret value from Client App Reg - 02 |
abpm.services.knowledgebase.adeptiaai.oauth.scope | OAuth scope for the access token. | api://<MAIN-APP-REG-CLIENT-ID>/.default |
abpm.services.knowledgebase.adeptiaai.oauth.tokenurl | Token URL for OAuth authentication. | https://login.microsoftonline.com/<TENANT-ID>/oauth2/v2.0/token |
abpm.services.knowledgebase.adeptiaai.allowed.file.extensions | Valid file extensions for creating a knowledge base. | pdf,csv,txt,jpeg,jpg,png |
abpm.services.knowledgebase.adeptiaai.file.maxsize | Maximum file size (in MB) for knowledge base files. | Set as per your requirement |
5. Testing
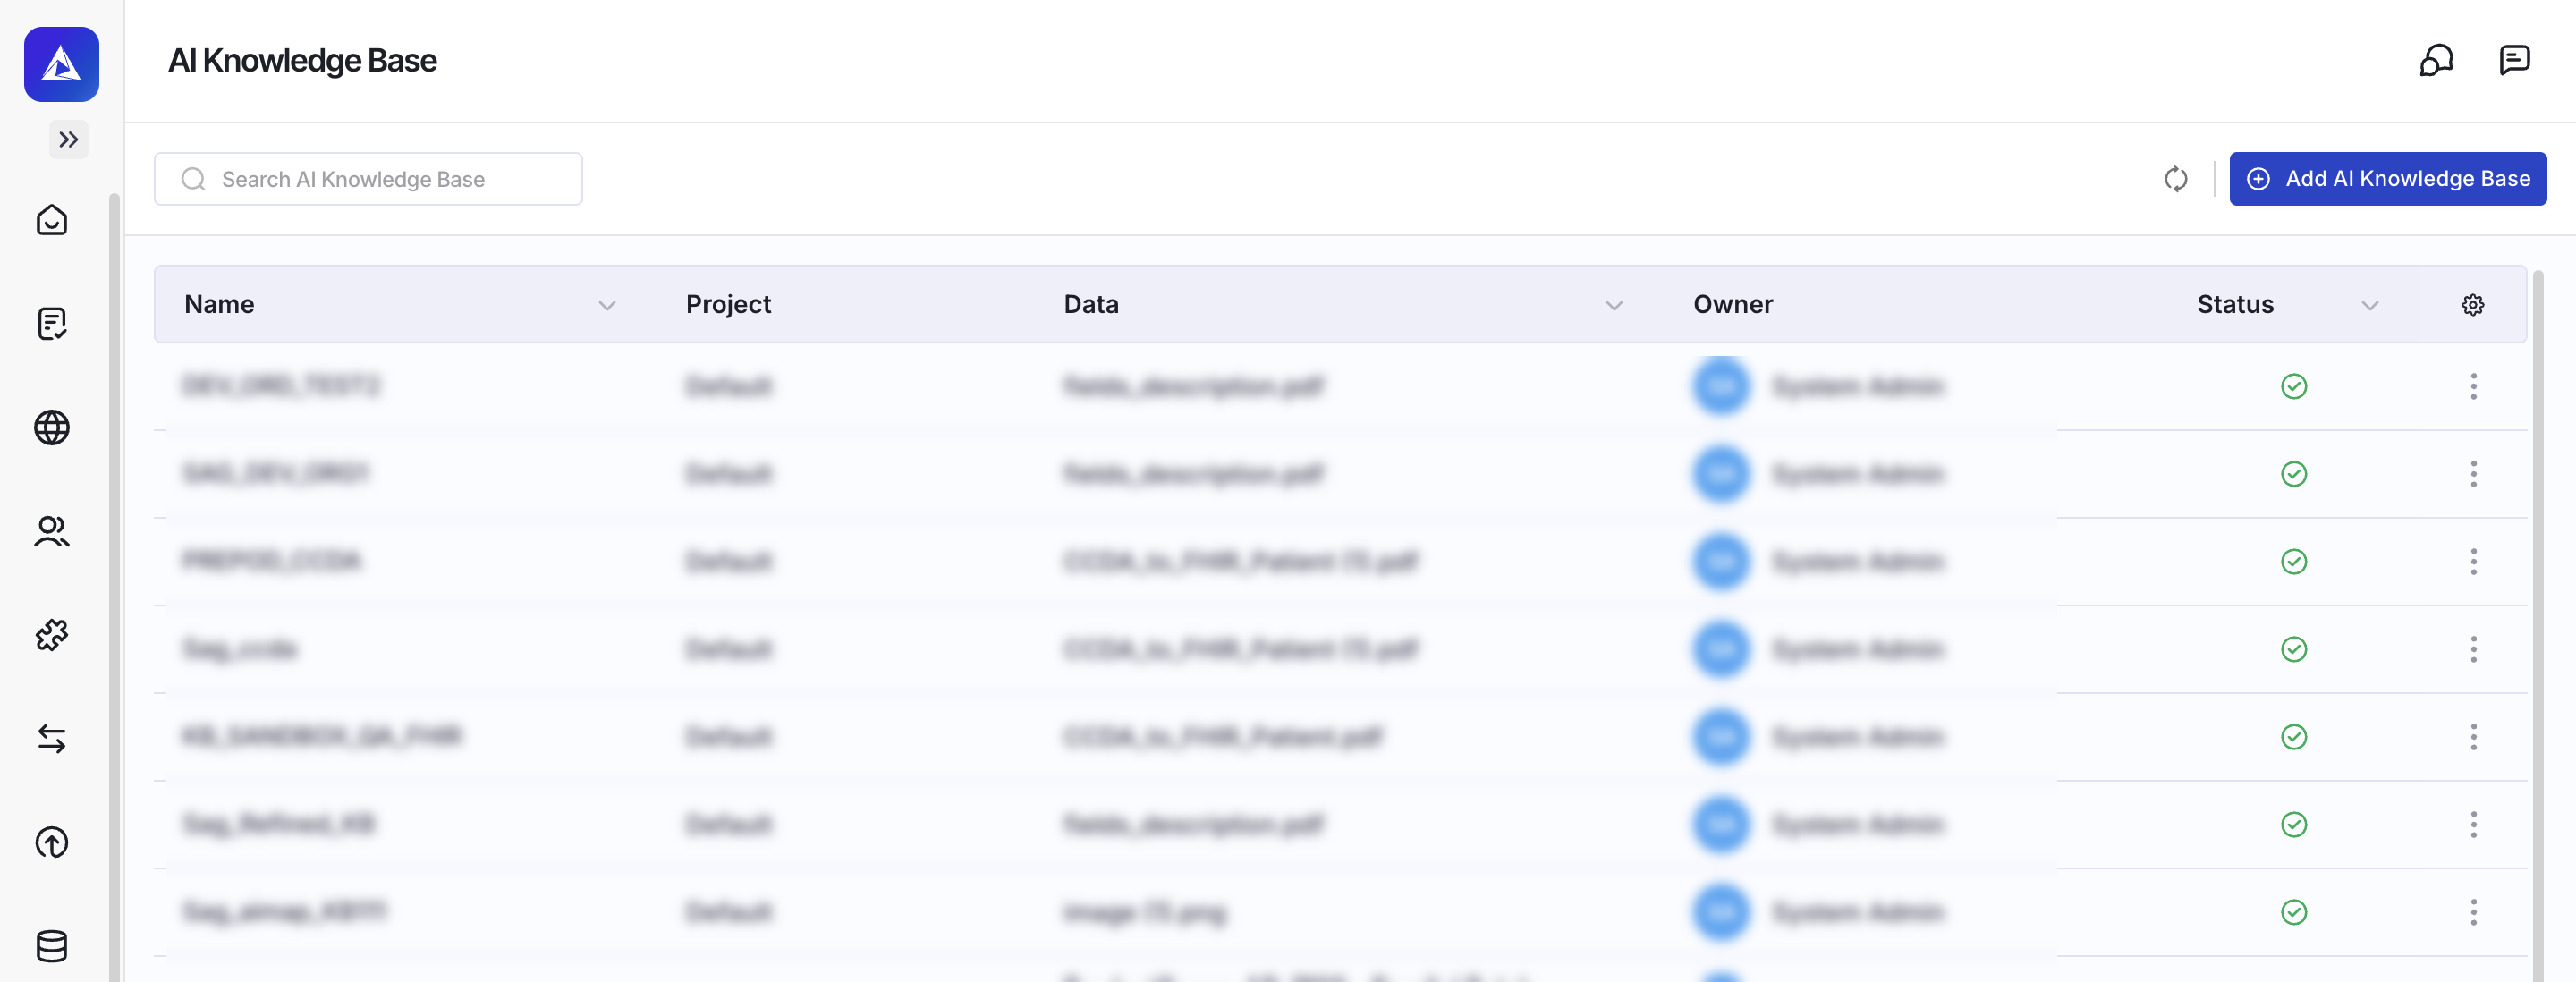
- Knowledge Base — Test the Knowledge Base from within the Adeptia application by navigating to the AI Knowledge Base section and uploading a test document.
- API connectivity — Test the API endpoint from Postman to verify end-to-end connectivity through APIM → Azure Web App → AI services.