Deploying on multiple nodes
This page provides step-by-step instructions for deploying Adeptia Automate using the Adeptia Rancher package in a multi-node setup.
Deployment steps
Follow the steps described below to deploy Adeptia Automate using the Adeptia Rancher package, which serves as the foundation for the on-premises deployment of Adeptia Automate.
-
Ensure that you have met the prerequisites for deployment on multiple nodes.
-
Connect to the Jump Box or the Primary Linux VM using PuTTY on you local Windows system.

Rancher deployment can be performed using either a Primary Linux VM or a Jump Box. -
**Provide Read/Write permissions on the SSH private key file (PEM) Code
sudo chmod 0600 <pem file>
** 4. #### Download the Adeptia Rancher package for multi-node deployment.
- In the Jump Box, create a directory.
Code
mkdir <Directory name, for example, rancher-multi-node>
- Navigate to the directory you created in the previous step.
Code
cd <Path of the directory>
- Download the package in the directory.
Code
wget https://adeptia.github.io/rancher-ansible-package/adeptia-rancher-5.2.x.tar.gz
-
Extract the package
- Run the following command to extract the package in the directory:
Code
sudo tar -xf adeptia-rancher-5.2.x.tar.gz
- If prompted, enter the password of the user with which you are logged in to the VM.
-
Install Ansible and Python on the Jumpbox or the Primary Linux VM to support the deployment process
Run the following command to:
- Grant executable permissions on prerequisite_ubuntu.sh file
- Execute the prerequisite_ubuntu.sh file.
Code
sudo chmod +x prerequisite_ubuntu.sh && sudo ./prerequisite_ubuntu.sh
This executes the prerequisite_ubuntu.sh file installing Ansible and Python on the VM node. In case, your underlying OS is RedHat or Amazon-Linux, you can use prerequisite_redhat.sh and prerequisite_amazon-linux.sh respectively. 7. #### Configure the inventory-cluster.ini file available in the extracted package
This****file defines the hosts (or group of hosts) on which the package is deployed. Follow the steps below to configure it.
- Open the inventory-cluster.ini ****file.
Code
sudo vi inventory/inventory-cluster.ini
-
Press the i (insert) key on the keyboard, and then add the domain name or IP address of the VMs and RKE2 agents (if you have any) under the [servers] and [agents] groups, respectively, as shown in the screenshot below.
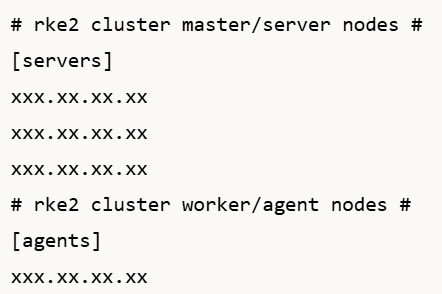

• RKE2 server (or master) will be deployed on the VMs whose IP addresses or domain name you enter under the [servers] group.
• RKE2 agent will be deployed on the VMs whose IP addresses or domain name you enter under the [agents] group.
• Adeptia recommends that you use private IPs of the VMs. -
Save the changes you made to the inventory file
-
Press Esc (Escape) key on the keyboard to exit from edit mode.
-
Type :wq and then press Enter to save the changes and close the file.

To exit without saving, type :q! and then press Enter.
-
-
Configure the general-config.yaml file available in the vars directory in the extracted package
The general-config.yaml file contains the deployment-related configuration variables. Follow the steps below to configure it.
- Navigate to the vars directory.
Code
cd vars
- Open the general-config.yaml file.
Code
sudo vi general-config.yaml
-
Press the i (insert) key on the keyboard, and then configure the variables discussed in the table below.
Variable Description install_mode Possible values are single or cluster ssh_user Username of the user with the required privileges to deploy Rancher on the VMs. ssh_key_path Complete path of the SSH private key (PEM) file you copied on your Jump Box. Enter the path of the .pem file in the following format:
/home/User1/Directory/abc.peml7_lb_enabled Set to true if using an L7 load balancer (Azure AGW, KEMP, etc.) — ports 80/443 only.
Possible values are true or falserke2_vip: kube-vip HA configuration (required when install_mode is cluster)
• Free private IP in the same subnet as the VMs, not assigned to any VM.
• Floats between control-plane nodes—used by kubectl (6443) and node registration (9345).For example: rke2_vip: 10.32.4.100backend_db_type Backend database type. The possible values are:
• SQL-Server
• Oracle
• MySQLbackend_db_url Value for SQL database
jdbc:sqlserver://<DB Hostname>:<Port Number>;database=<Backend database> Name>;sendStringParametersAsUnicode=false
Value for Oracle database
jdbc:oracle:thin:@<hostName>:<portNumber>:<SID/ServiceName>
Value for MySQL database
jdbc:mysql://<hostName>:<portNumber>/<Backend DB Name>?sslMode=VERIFY_IDENTITY&fallbackToSystemKeyStore=falsebackend_db_username
• Backend DB username.
• Use either the database server admin credentials or a database user with required access to the Backend database.backend_db_password Backend DB password. log_db_type Log database type. The possible values are:
• SQL-Server
• Oracle
• MySQLlog_db_url Value for SQL database
jdbc:sqlserver://<DB Hostname>:<Port Number>;database=<Log database Name>;sendStringParametersAsUnicode=false
Value for Oracle database jdbc:oracle:thin:@<hostName>:<portNumber>:<SID/ServiceName>
Value for MySQL database
jdbc:mysql://<hostName>:<portNumber>/<Log DB Name>?sslMode=VERIFY_IDENTITY&fallbackToSystemKeyStore=falselog_db_username
• Log DB username.
• Use either the database server admin credentials or a database user with required access to the Log database.log_db_password Log DB password. aimap_log_url Value for SQL database
mssql+pyodbc://<host>:<port>/<Log DB Name>?driver=ODBC+Driver+17+for+SQL+Server
Value for Oracle database
oracle+cx_oracle://<host>:<port>/<SID/ServiceName>
Value for MySQL database
mysql+mysqlconnector://<host>:<port>/<Log DB Name>aimap_backend_url Value for SQL database
mssql+pyodbc://<host>:<port>/<Backend DB Name>?driver=ODBC+Driver+17+for+SQL+Server
Value for Oracle database
oracle+cx_oracle://<host>:<port>/<SID/ServiceName>
Value for MySQL database
mysql+mysqlconnector://<host>:<port>/<Backend DB Name>ai_agent_backend_url Value for SQL database
mssql+pyodbc://<host>:<port>/<Backend DB Name>?driver=ODBC+Driver+17+for+SQL+Server
Value for Oracle database
oracle+cx_oracle://<host>:<port>/<SID/ServiceName>
Value for MySQL database
mysql+mysqlconnector://<host>:<port>/<Backend DB Name>rancher_lb_domain DNS domain mapped to the IP of the VM for accessing Rancher UI, for example:
rancher.company.com
Using this domain, you can access the Rancher UI.app_lb_domain DNS domain mapped to the IP of the VM for accessing application UI, for example:
myapp.company.com
Using this domain, you can access the application UI.shared_pv The variable containing the following parameters that help you define the shared PV:
• volume_mode
• local_mount_path
• nfs_server
• nfs_shared_pathvolume_mode Specify how the shared volume shall be accessed. The possible values are:
• local
• nfslocal_mount_path Provide the local volume path if you have set the volume_mode to local. nfs_server Provide the NFS server domain or IP if you have set the volume_mode to nfs. nfs_shared_path Enter the NFS shared path in the following format:
/<Sub-folder (if any) or the folder path bound with the NFS share>tlsCrt TLS signed certificate in base64 encoding (for Envoy gateway setup). To know how to extract the certificate and convert it to Base64 encoding, refer to this page. tlsKey TLS private key of the certificate in base64 encoding (for Envoy gateway setup). To know how to extract the private key and convert it to Base64 encoding, refer to this page. mcp_enabled It is set to false by default. if you want to install the mcp observe service, then set this property to true during installation mcp_version Version of the mcp observe you want to install ac_version Version of the Adeptia Automate application you want to install The additional configurations that you may want to make before you deploy Rancher are discussed on this page.
-
Save the changes you made to the general-config.yaml file
-
Press Esc (Escape) key on the keyboard to exit from edit mode.
-
Type :wq and then press Enter to save the changes and close the file.
To exit without saving, type :q! and then press Enter.
-
-
Configure the vault-config.yaml file available in the vars directory in the extracted package
The vault-config.yaml file contains sensitive information, such as passwords, required to validate and run the package. Follow the steps below to configure it.
- Open the vault-config.yaml file.
Code
sudo vi vault-config.yaml
-
Press the i (insert) key on the keyboard, and then configure the variables discussed in the table below.
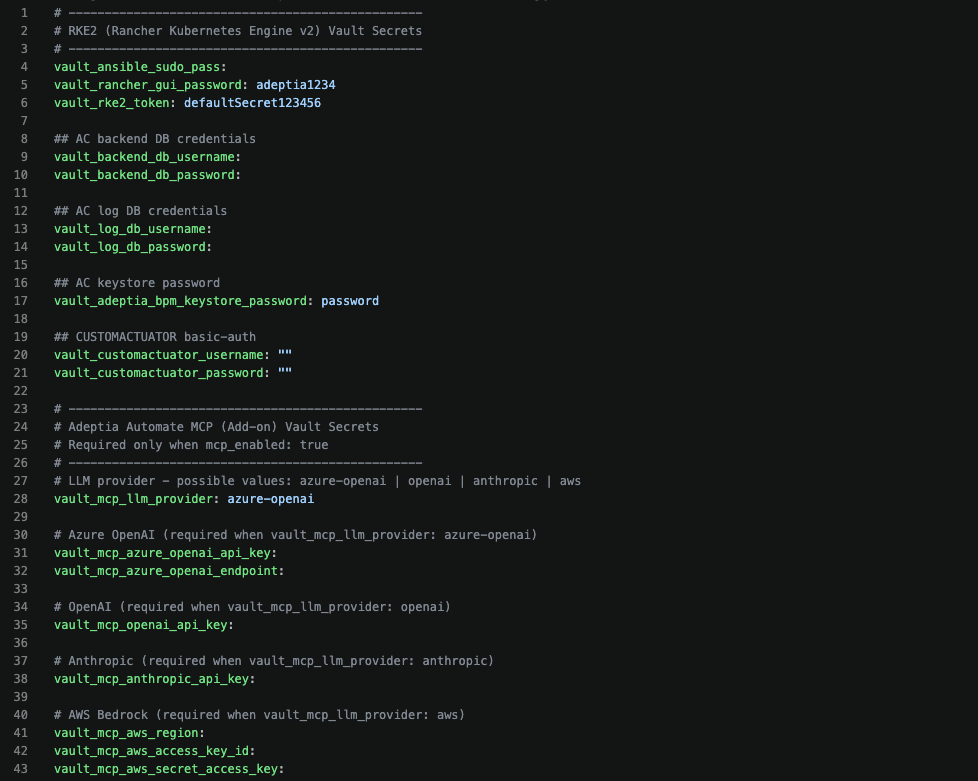
Variable Description vault_ansible_sudo_passSudo password used by Ansible when privilege escalation is required on target hosts. vault_backend_db_usernameUsername for the AC backend database connection. vault_backend_db_passwordPassword for the AC backend database connection. vault_log_db_usernameUsername for the AC log database connection. vault_log_db_passwordPassword for the AC log database connection. vault_customactuator_usernameBasic authentication username for the CUSTOMACTUATOR. vault_customactuator_passwordBasic authentication password for the CUSTOMACTUATOR. >
> The following variables are required only if you want to install MCP Observe using this Rancher package. To install MCP Observe, setmcp_enabledtotrueand specify the MCP version using themcp_versionproperty in thegeneral-config.yamlfile.
>vault_mcp_llm_providerLLM provider used by Adeptia Automate MCP. Supported values are azure-openai,openai,anthropic, andaws. The default value isazure-openai.vault_mcp_azure_openai_api_keyAzure OpenAI API key. Required only when vault_mcp_llm_provideris set toazure-openai.vault_mcp_azure_openai_endpointAzure OpenAI endpoint URL. Required only when vault_mcp_llm_provideris set toazure-openai.vault_mcp_openai_api_keyOpenAI API key. Required only when vault_mcp_llm_provideris set toopenai.vault_mcp_anthropic_api_keyAnthropic API key. Required only when vault_mcp_llm_provideris set toanthropic.vault_mcp_aws_regionAWS Region for Amazon Bedrock. Required only when vault_mcp_llm_provideris set toaws.vault_mcp_aws_access_key_idAWS access key ID for Amazon Bedrock. Required only when vault_mcp_llm_provideris set toaws.vault_mcp_aws_secret_access_keyAWS secret access key for Amazon Bedrock. Required only when vault_mcp_llm_provideris set toaws.The password you provide in the vault-config.yaml file are in plain text and cannot be encrypted. To know more on encrypting the vault-config.yaml file, refer to this page.
-
Save the changes you made to the vault-config.yaml file
-
Press Esc (Escape) key on the keyboard to exit from edit mode.
-
Type :wq and then press Enter to save the changes and close the file.
To exit without saving, type :q! and then press Enter.
-
-
Deploy Rancher
- Navigate to the location where you had extracted the package.
Code
cd..
| The command cd.. takes you back from vars (current directory) to the previous directory (the directory where you extracted the package). |
|---|
- Grant executable permission on adeptia-rancher.sh file.
Code
sudo chmod +x adeptia-rancher.sh
- Run the following command to install Rancher and all its components, including the Adeptia Automate application.
Code
sudo ./adeptia-rancher.sh --tag=install-all
The --tag argument in the command can have the following values based on what components of the package you want to install.
| Tag | Description |
|---|---|
--tag=install-platform | Brings up RKE2 → Envoy Gateway → Rancher → LAN Volume Provisioner. After this, you have a working K8s cluster with ingress + storage but no app. |
--tag=install-dependencies | Adds RabbitMQ Operator and KEDA on top of the platform. |
--tag=install-application | Installs Adeptia Automate. If mcp_enabled: true, also installs the MCP add-on. Re-renders Envoy routes so the app is reachable via your domain. |
--tag=install-all | Runs all three layers end-to-end. The typical "fresh install" command. |
| • If you are using an encrypted vault-config.yaml file, you need to pass the argument--ask-vault-pass while executing the shell file as shown in the example below: sudo ./adeptia-rancher.sh --ask-vault-pass • Deploy all the components by running the command sudo ./adeptia-rancher.sh --tag=install-all, |
|---|
It takes approximately 20 to 30 minutes for the installation to complete. After the successful deployment, you will see the Rancher UI and the Adeptia Automate application URL on the screen.
| You can find the deployment-related logs in the installation.log file at /logs location. |
|---|