Introducing additional nodes to the cluster
In a cluster, pods share the resources available across the nodes. In case the available resources are not enough for the application to run smoothly, you may want to introduce additional nodes to the cluster. Before you add a node to the existing cluster, you need to ensure that:
 | This document is not applicable for single-node deployment. |
|---|
- The node to be added must have the same configuration as that of the other existing nodes.
- The RKE2 server is running.
- You have set up the new node. You need to meet this prerequisite only when you have Red Hat OS installed on the node.
Steps for setting up the new node
Follow the steps given below to set up the node before you add it to the cluster.
- Disable and stop the firewall by running the following set of commands in the same order:
Code
sudo systemctl disable firewalld

sudo systemctl stop firewalld
- Disable and stop the nm-cloud-setup.timer network manager service by running the following set of commands in the same order:
Code
sudo systemctl disable nm-cloud-setup.timer

sudo systemctl stop nm-cloud-setup.timer
- Disable and stop the nm-cloud-setup.service network manager service by running the following set of commands in the same order:
Code
sudo systemctl disable nm-cloud-setup.service

sudo systemctl stop nm-cloud-setup.service
- Run the following set of commands in the same order to install the nfs-utils, iptables, and open-iscsipackages:
Code
sudo yum install nfs-utils

sudo yum install iptables-services
sudo yum --setopt=tsflags=noscripts install iscsi-initiator-utils
- Start and then stop the iptables service by running the following set of commands in the same order.
Code
sudo systemctl start iptables

sudo systemctl stop iptables
- Run the following set of commands in the same order to enable and start the open-iscsi service.
Code
sudo systemctl enable iscsid

sudo systemctl start iscsid
Steps for adding the new node
Following are the steps to add the node.
-
Open the inventory-cluster.ini file from the inventory folder.
-
In the inventory file, add the domain name or IP address of the server node or worker node you want to introduce as illustrated in the following screenshot.

• If you want to add a server (master) node, enter the node’s IP address or domain name under the [servers] group in the inventory file.
• If you want to add a worker node, enter the node’s IP address or domain name under the [agents] group in the inventory file.

- Run the following command.
Code
$ sudo ./adeptia-rancher.sh --tag=add-nodes
Verify the new node
Follow the steps given below to verify if the node has been added to the cluster.
-
Log in to the Rancher UI.
-
Click the burger menu at the top-left corner, and then click local.
-
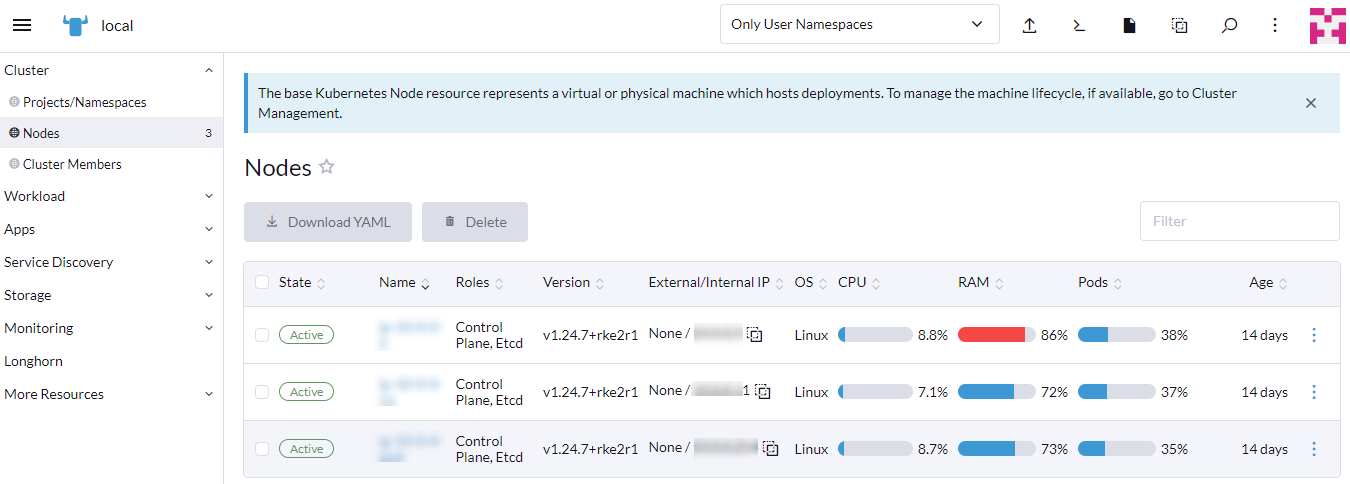
In the left panel, expand Cluster, and then click Nodes.
-
Check if the node you have added is listed under Nodes by verifying the following:
-
The domain name or IP address of the added node is visible under the Name column.
-
The role (under the Roles column) for the added node is set to Control Plane, Etcd or Agent, Etcd based on the type of node.
- If you have added a server node, the role must be set to Control Plane, Etcd.
- If you have added a worker node, the role must be set to Agent, Etcd.
-
The version of the added node is the same as that of the other existing nodes.
-
-
Check if the status of the added node is Active (under the State column).
Once the node has been added, in addition to the resources of the existing nodes, the resources of this newly added node also become available to be used by the pods.