Installing RabbitMQ Operator
RabbitMQ is a message broker that Adeptia Automate uses for internal communication between its microservices. It is required for the application to run and is deployed as part of the application deployment. To deploy RabbitMQ, the RabbitMQ Cluster Operator must be installed. The Operator is responsible for creating, managing, and maintaining the availability of the RabbitMQ cluster. RabbitMQ can be deployed in both High Availability (HA) and non-HA modes.
As part of the deployment, you can optionally restrict the RabbitMQ Operator's visibility to specific namespaces instead of allowing it to watch all the namespaces across the cluster. This provides better security and isolation by limiting the Operator's access to only the namespaces it needs to manage.
This document covers the following:
- Prerequisite
- Step 1 — Apply CRDs and configure RBAC
- Step 2 (Optional) — Restrict RabbitMQ Operator's visibility
- Step 3 — Install RabbitMQ Operator
Prerequisite
To install RabbitMQ Operator, you need to authenticate to the Kubernetes cluster as a user with CRUD permissions on the following resources:
- Namespace
- CustomResourceDefinition (Cluster level component)
- Deployment
- ServiceAccount
- Role
- ClusterRole (Cluster level component)
- RoleBinding
- ClusterRoleBinding (Cluster level component)
- Service
- ValidatingWebhookConfiguration (Cluster level component)
Step 1 — Apply CRDs and configure RBAC
Before deploying the RabbitMQ Cluster Operator, you must apply the necessary Custom Resource Definitions (CRDs) and role-based access control (RBAC) configurations.
-
Ensure that you have met the prerequisites mentioned onthis page.
-
(Optional): Connect to the Jump Box using Remote Desktop Protocol (RDP). It is required only when you use Jump Box for deployment.
-
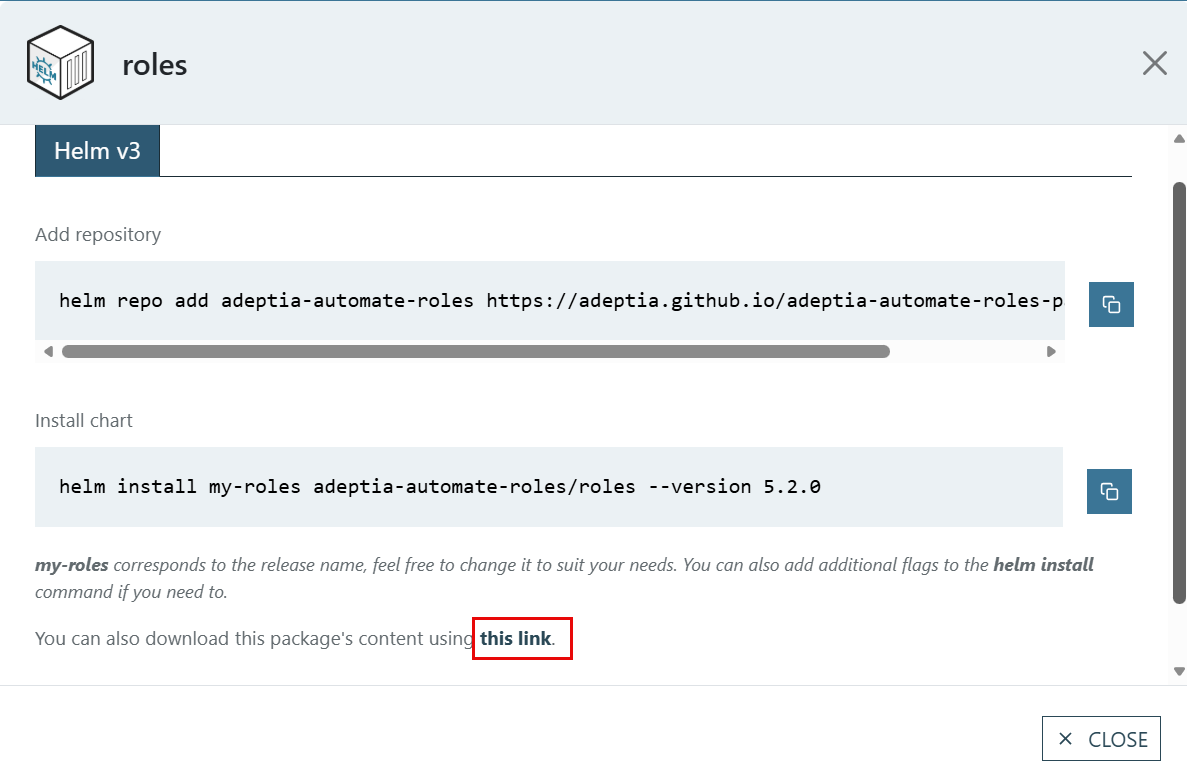
Go to the following ArtifactHUB page for roles: https://artifacthub.io/packages/helm/adeptia-automate-roles/roles/5.2.0
-
Click INSTALL.
-
On the roles screen, download the roles package by clicking this link option.
-
Unzip the downloaded package.
-
In the extracted package, go to the roles\rabbitmq_Operator_roles\rbac folder where the RBAC files for the RabbitMQ Operator are located.
-
Update the RBAC files as discussed in the following table:
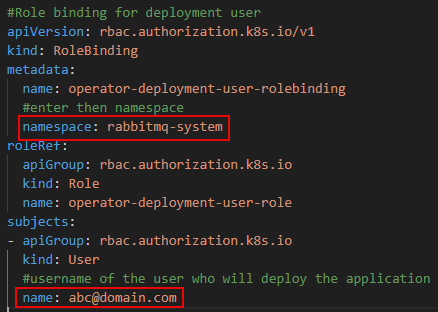
File Field to update Value to use cluster-Operator/clusterrolebinding.yamlsubjects.namespaceEnter the Operator namespace. cluster-Operator/role.yamlmetadata.namespaceEnter the Operator namespace. cluster-Operator/rolebinding.yamlmetadata.namespaceandsubjects.namespaceEnter the Operator namespace. messaging-topology-Operator/clusterrolebinding.yamlsubjects.namespaceEnter the Operator namespace. messaging-topology-Operator/role.yamlmetadata.namespaceEnter the Operator namespace. messaging-topology-Operator/rolebinding.yamlmetadata.namespaceandsubjects.namespaceEnter the Operator namespace. deployment-user/deployment-user-clusterrolebinding.yamlsubjects.nameEnter the email address of the user who will manage the deployment of RabbitMQ Operator. deployment-user/deployment-user-role.yamlmetadata.namespaceEnter the Operator namespace. deployment-user/deployment-user-role-binding.yamlmetadata.namespaceandsubjects.nameEnter the email address of the user who will manage the deployment of RabbitMQ Operator and the Operator namespace in the respective fields.
Example: If your Operator namespace is rabbitmq-system and the email address of the user who will manage the deployment of RabbitMQ Operator is abc@domain.com, update the RBAC files as shown below:
 10. Create a namespace in the Cluster where the RabbitMQ Operator will be deployed.
 | While you can install RabbitMQ Operator in any namespace, it is recommended that you install it in a namespace separate from the one where Adeptia Automate will be deployed. |
|---|
Code
kubectl create namespace <Operator Namespace>
- Apply the RBAC files by running the following commands:
Code
kubectl apply -f roles/rabbitmq_operator_roles/crds -R -n <Operator Namespace>
kubectl apply -f roles/rabbitmq_operator_roles/rbac/cluster-operator -R -n <Operator Namespace>
kubectl apply -f roles/rabbitmq_operator_roles/rbac/deployment-user -R -n <Operator Namespace>
kubectl apply -f roles/rabbitmq_operator_roles/rbac/messaging-topology-operator -R -n <Operator Namespace>
Step 2 (Optional) — Restrict RabbitMQ Operator's visibility
By default, the RabbitMQ Operator watches all namespaces in the cluster. However, you can configure it to watch only specific namespaces by following the steps given below. This enhances security and isolation by limiting the operator’s visibility and control to selected areas of the cluster.
- Go to the following ArtifactHUB page for RabbitMQ Operator’s package. https://artifacthub.io/packages/helm/adeptia-automate-operator/rabbitmq-cluster-operator/5.2.0 https://artifacthub.io/packages/helm/adeptia-automate-roles/roles/5.2.0
- ClickDEFAULT VALUES.
- On the Default values screen, click
 icon to download the values.yaml file for RabbitMQ Operator.
 - In the values.yaml, do the following:
-
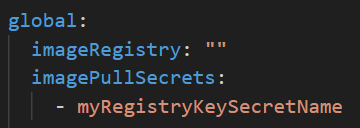
Optional: If you are using a private repository to host the RabbitMQ Operator images, replace the existing value for global.imagePullSecrets parameter with your existing Secret as shown below:
-
Update the parameters as described in the table below:
Field to Update Change required clusterOperator.watchAllNamespaces Set to falseto disable watching all namespaces. clusterOperator.watchNamespaces Specify the namespace (or namespaces) the operator should watch, as shown in the example below. 
msgTopologyOperator.watchAllNamespaces Set to falseto disable watching all namespaces. msgTopologyOperator.watchNamespaces Specify the namespace (or namespaces) the operator should watch, as shown in the example below.
-
 | The changes made here will be applied when deploying the Operator in Step 3 below. |
|---|
Step 3 — Install RabbitMQ Operator
Follow these steps to install the RabbitMQ Operator in your Kubernetes cluster.
- Add the RabbitMQ Operator repo using the following command: Code
helm repo add <Repo name> https://adeptia.github.io/adeptia-automate-rabbitmq-operator-package/charts/
- Update the helm repo.
Code
helm repo update
- Run the command in the following format to install RabbitMQ Operator:
Code
helm install <Release name> <Repo name>/rabbitmq-cluster-operator --version 5.2.0 -f "<Path of the RabbitMQ values.yaml>" -n <Operator namespace>
Verifying the installation
Before proceeding with the application deployment, confirm that the Operator pods are running by following the steps given below:
- Run the following command to see the running pods.
Code
kubectl get pods -n <Operator namespace>
- Ensure that the pods for the following deployments are in the
Runningstate:- rabbitmq-cluster-operator
- messaging-topology-operator
Once the operator is running, proceed to deploy Adeptia Automate.