Deploying Adeptia Automate MCP and Observe
Observe is the monitoring and visibility hub for Adeptia Automate. From a single interface, you can track the health of your integrations in real time, review execution history, and generate AI-powered dashboards.
Observe is powered by the MCP Server, which acts as the backend that connects Adeptia Automate with the AI layer. Both Observe and MCP Server are packaged together in the adeptia-automate-mcp Helm chart. They are not deployed as part of the standard Adeptia Automate installation. You can deploy them separately as an independent Helm release after the main application is running.
Prerequisites
Before deploying Adeptia Automate MCP and Observe, ensure the following:
- Admin rights on the Kubernetes Cluster.
- Adeptia Automate is deployed in the namespace in which you plan to deploy MCP and Observe.
- Envoy Gateway set up for Adeptia Automate.
- You have the credentials available for your preferred LLM provider (
azure-openai,openai,anthropic, oraws).
Deploying Adeptia Automate MCP and Observe
Perform the following steps to deploy the Adeptia Automate MCP server:
 | If you are on Windows, ensure that you run the commands in PowerShell. |
|---|
-
Download the Adeptia Automate MCP and Observe package.
- On your Jumpbox or the local machine, create a directory, for example Downloaded_MCP_Observe.
Code
mkdir <Directory name>
- Navigate to the directory you created in the previous step.
Code
cd <Path of the directory>
- Download the package in the directory. Windows:
Code
Invoke-WebRequest -Uri "https://adeptia.github.io/adeptia-automate-mcp-helm-package/charts/adeptia-automate-mcp-1.0.0.tgz" -OutFile "adeptia-automate-mcp-1.0.0.tgz"
Linux:
Code
wget https://adeptia.github.io/adeptia-automate-mcp-helm-package/charts/adeptia-automate-mcp-1.0.0.tgz
-
Extract the package.
- Run the following command to extract the package in the directory: Windows:
Code
tar -xzvf adeptia-automate-mcp-1.0.0.tgz
Linux:
Code
sudo tar -xf adeptia-automate-mcp-1.0.0.tgz
-
Configure the values.yaml.
- Navigate to the adeptia-automate-mcpdirectory.
Code
cd adeptia-automate-mcp
- Open the values.yaml file. Windows: Run the following command:
Code
notepad values.yaml
Linux: Run the following command and then press the i (insert) key on the keyboard:
Code
sudo vi values.yaml
-
Set your LLM provider and credentials under the
observe.llmsection.The LLM provider is set to azure-openaiby default. Set theproviderfield to your preferred provider (azure-openai,openai,anthropic, oraws) and fill in only that provider's section. Leave the other provider sections empty. For example, if you are usingazure-openai, setprovider: azure-openaiand fill in the following field only:
•azure-openai.apiKey
•azure-openai.endpoint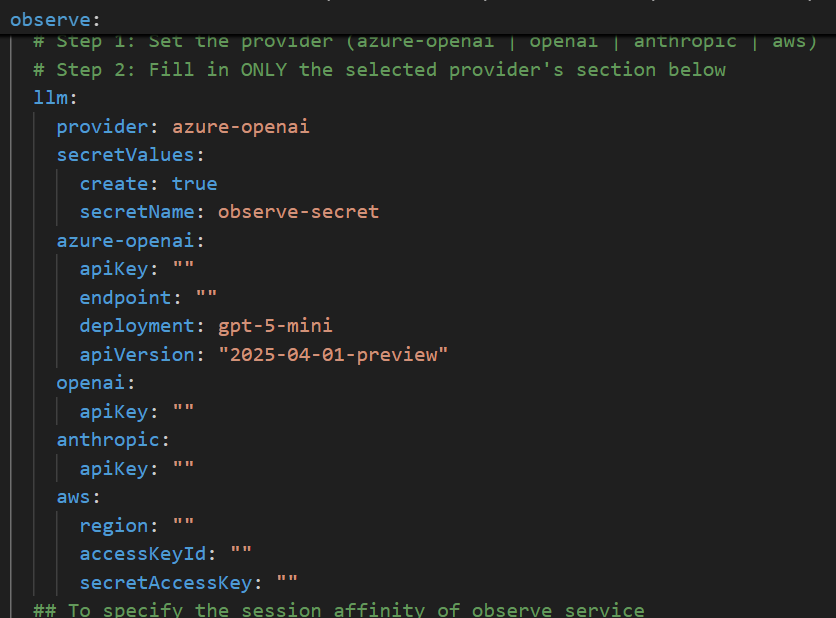
-
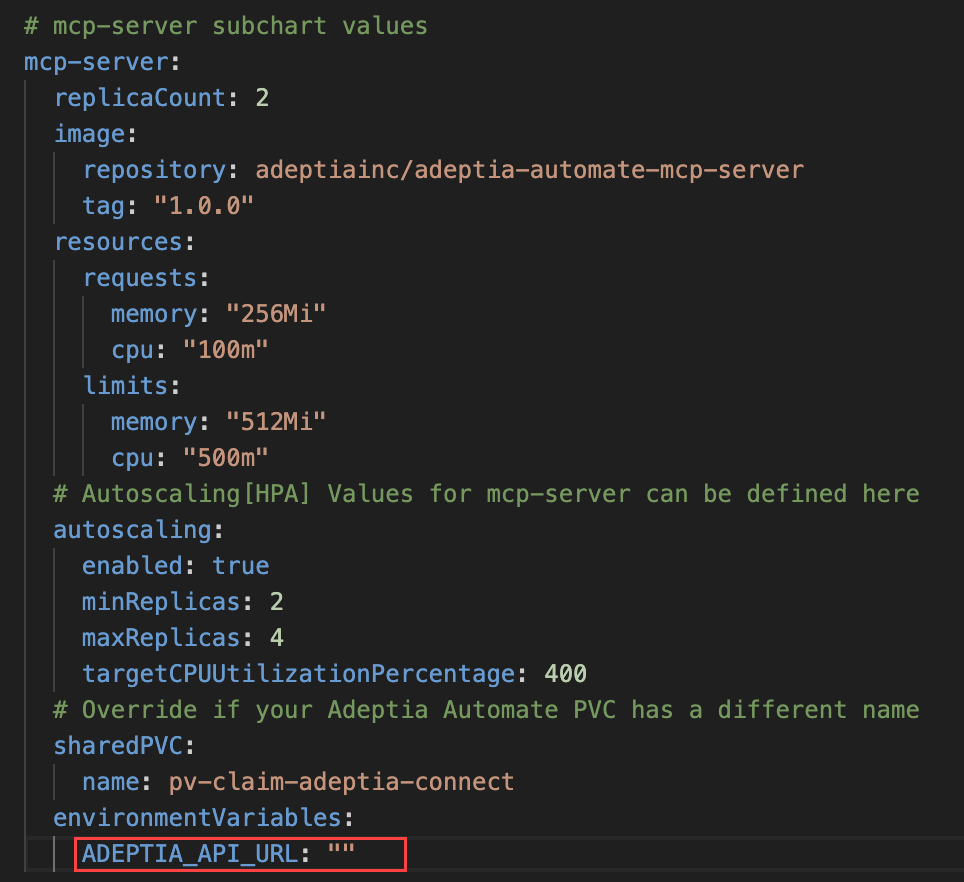
-
Save and close the file. Linux: Press Esc (Escape) key on the keyboard to exit from edit mode, type :wq, and then press Enterto save and close the file.
-
Deploy Adeptia Automate MCP and Observe.
- Navigate back to the directory where you extracted the package.
Code
cd ..
 | This takes you back from adeptia-automate-mcp(current directory) to the previous directory (The directory, for example, Downloaded_MCP_Observe, where the package was extracted). |
|---|
- Add the Adeptia Automate MCP and Observe Helm repository and update it by running the following two commands:
Code
helm repo add <Repo name> https://adeptia.github.io/adeptia-automate-mcp-helm-package/charts
Code
helm repo update
- Deploy MCP Observe.
Code
helm install <Release name> <Repo name>/adeptia-automate-mcp --version 1.0.0 -f "<Path of the values.yaml>" -n <Adeptia Automate Namespace> --debug --timeout=20m
5. Verify the deployment.
- Run the following command to check the status of the pods:
Code
kubectl get pods -n <Adeptia Automate Namespace>
-
Confirm that both the
observeandmcp-serverpods show a status ofRunning. -
Make MCP server and Observe specific changes to the HTTP Route yaml file available for Envoy Gateway setup for traffic routing purposes.
Ensure that you have the required privileges to update the Envoy related configuration, for example, permission to update the HTTP Route yaml file. - Update the existing HTTP Route resource in your namespace to add the Observe and MCP server services as a backend. Add the following rule at the end of the ****
rules**** section:
- Update the existing HTTP Route resource in your namespace to add the Observe and MCP server services as a backend. Add the following rule at the end of the ****
Code
- backendRefs:
    - group: ''
      kind: Service
      name: observe
      port: 443
      weight: 1
  matches:
    - path:
        type: PathPrefix
        value: /observe
  timeouts:
    backendRequest: 30m
    request: 30m
- backendRefs:
    - group: ''
      kind: Service
      name: mcp-server
      port: 443
      weight: 1
  matches:
    - path:
        type: PathPrefix
        value: /mcp
    - path:
        type: PathPrefix
        value: /.well-known
    - path:
        type: PathPrefix
        value: /oauth
- Apply the HTTP Route yaml and verify by running the following three commands:
Code
kubectl apply -f <HTTP Route yaml>
kubectl get httproute -n <Application Namespace>
kubectl describe httproute <http Route Name> -n <Application Namespace>
- Create a new Backend TLS Policy yaml to configure TLS termination between Envoy Gateway and the MCP server and Observe service.
Code
apiVersion: gateway.networking.k8s.io/v1
kind: BackendTLSPolicy
metadata:
  name: <bankedtls-policy_name>          # e.g. observe-backend-tls-policy
  namespace: <application-namespace>     # e.g. adeptia-app
spec:
  targetRefs:
    - group: ''
      kind: Service
      name: observe
      sectionName: https
  validation:
    caCertificateRefs:
      - group: ''
        kind: ConfigMap
        name: <Name of the ConfigMap>   #This ConfigMap is created during Envoy setup
    hostname: adeptiaconnect
---
apiVersion: gateway.networking.k8s.io/v1
kind: BackendTLSPolicy
metadata:
  name: <bankedtls-policy_name>           # e.g. mcp-backend-tls-policy
  namespace: <application-namespace>      # e.g. adeptia-app
spec:
  targetRefs:
    - group: ''
      kind: Service
      name: mcp-server
      sectionName: https
  validation:
    caCertificateRefs:
      - group: ''
        kind: ConfigMap
        name: <Name of the ConfigMap>   #This ConfigMap is created during Envoy setup
    hostname: adeptiaconnect
- Apply the Backend TLS Policy and verify by running the following two commands:
Code
kubectl apply -f <Backend TLS Policy yaml file> -n <Application Namespace>
kubectl describe backendtlspolicy <Backend TLS Policy name> -n <Application Namespace>