Creating a Standard Layout
Adeptia Connect provides user the flexibility to generate data in standard formats either by creating a Standard Layout or using a bundled Standard Layout. This helps businesses handle data efficiently, making sure it's consistent and follows predefined structures.
 | A Standard Layout can be created or configured by an IT user. |
Creating a Standard Layout
Follow the steps given below to create a Standard Layout.
-
Click Dashboard > ConfigureStandardLayout.
-
Click **Create Standard Layout.
**
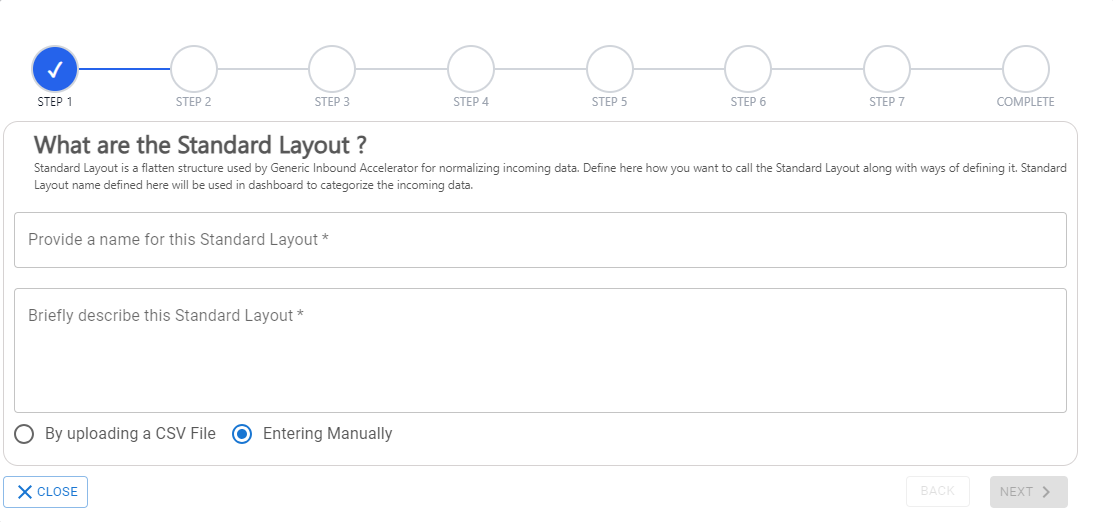
You may either provide the details by entering the values manually or uploading a CSV file by clicking on the relevant option. -
On the What are the Standard Layout? Screen,
- Provide a name for the Standard Layout.
- Provide a description for the Standard Layout.
- Click Next.
-
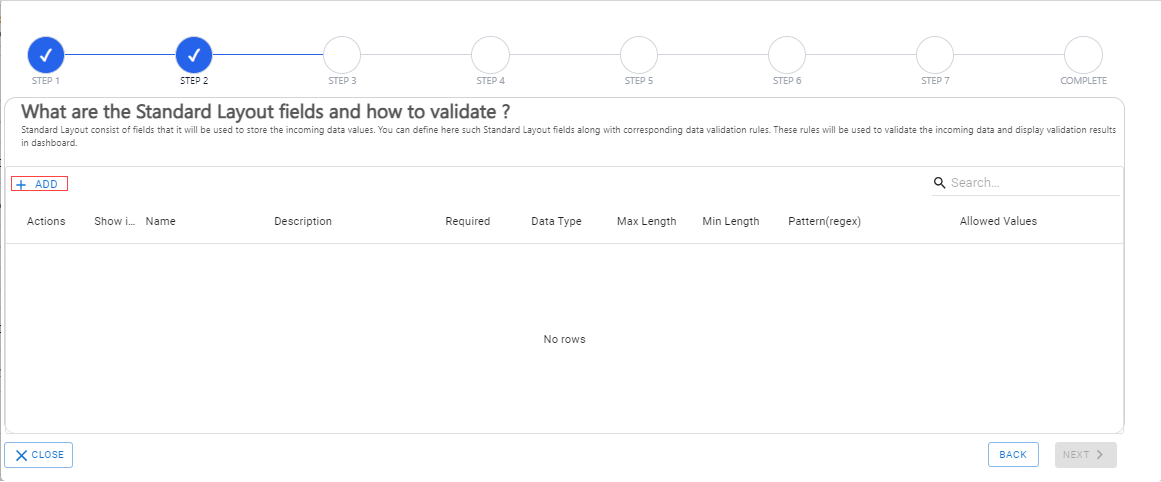
On the Step 2 screen,
-
Click **Add.
 **
** -
On the Standard Layout field screen, enter the following details to define the data validation rule for the specific fields.
-5324bb79b80a48bd35bff4e2f9db2ac9.png)
- Provide a name for the Standard Layout field.
- Provide a description for the Standard Layout.
- Define the Required field in the following manner,
-
At the Required step**,** select Yes from the dropdown to make the Standard Layout field mandatory. Or else select No.
By default the value for the field is set to No. -
Select the severity type (Warning or Error) from the Severity list.
Severity Type Description Warning Select this option if you want a notification to appear when a value for the field is missing.
Error Select this option if you want an error to be triggered when a value for the field is missing. By default the value for the field is set to Warning. -
At the Error Code step, select the error code type from the dropdown or define an error code manually. The available list of error codes are as follows:
Error Code type Description ABC_Errorcode DQ_AllowedValues This error code indicates a validation failure related to allowed values of a field. DQ_DataLength This error code indicates a validation failure related to the data length of a field. DQ_DataType This error code indicates a validation failure related to the data type of a field. DQ_Enum DQ_Numeric DQ_Pattern This error code indicates a validation failure related to the data pattern of a field. DQ_Required This error code indicates a validation failure related to a required field. Test_Error
-
- Define the Data Type field in the following manner,
- Define the field length for the Standard Layout field in the following manner,
- Define the pattern for the Standard Layout field in the following manner,
- Define the Allowed Values field in the following manner,
- Click Submit.
-
-
On the Enrichment Pre Data Mapping screen do the following if you want to map/modify the data before processing.
 pro-27a4907c8ceb95193f1a230d75b037c6.png)
- Click Create.
- Enter the mapping name and description of the new mapping activity.
- Create the mapping between the elements of the Source and the Destination. (Do we need to talk about extension element?)
- Save the mapping and exit.
The mapping is listed on the Enrichment Pre Data Mapping screen. - Select the required mapping from the list provided on the screen.
- Click Next.
-
On the Step 4 screen... (Business rules- coming soon)
-
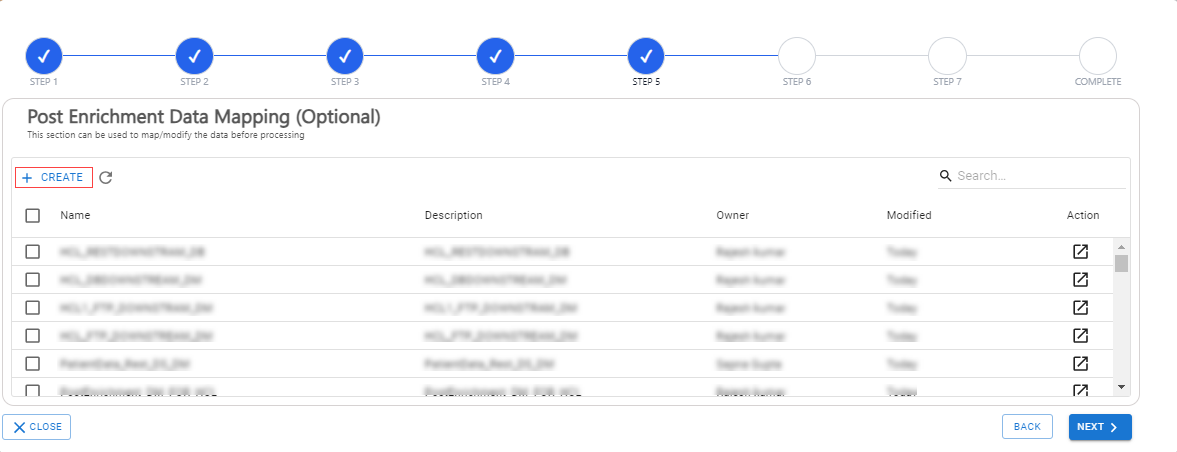
On the Post Enrichment Data Mapping screen (need more understanding on the purpose)
-
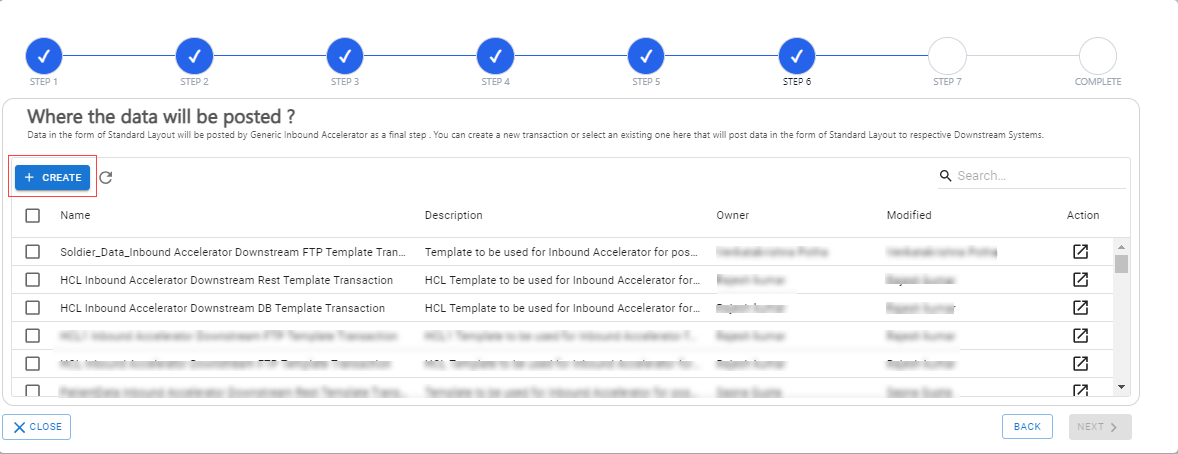
On the Step 6 (Where the data will be posted?) screen define the Target where the data will be posted. You can either create a new Transaction or select an existing one from the list which will post data in the form of Standard Layout to the respective Downstream Systems. If you want to create a new Transaction, do the following,
-
Click Create.
You will be re-directed to the Inbound Accelerator Downstream Template screen. Select from the list of Templates based on the Target type where you want the output to be posted. The available options are: Database, FTP and REST.You may use one or more than one Inbound Accelerator Downstream Template based on your requirement. -
Select Use This on the required Template. For Example- Select Inbound Accelerator Downstream FTP Template for posting output to an FTP.
-
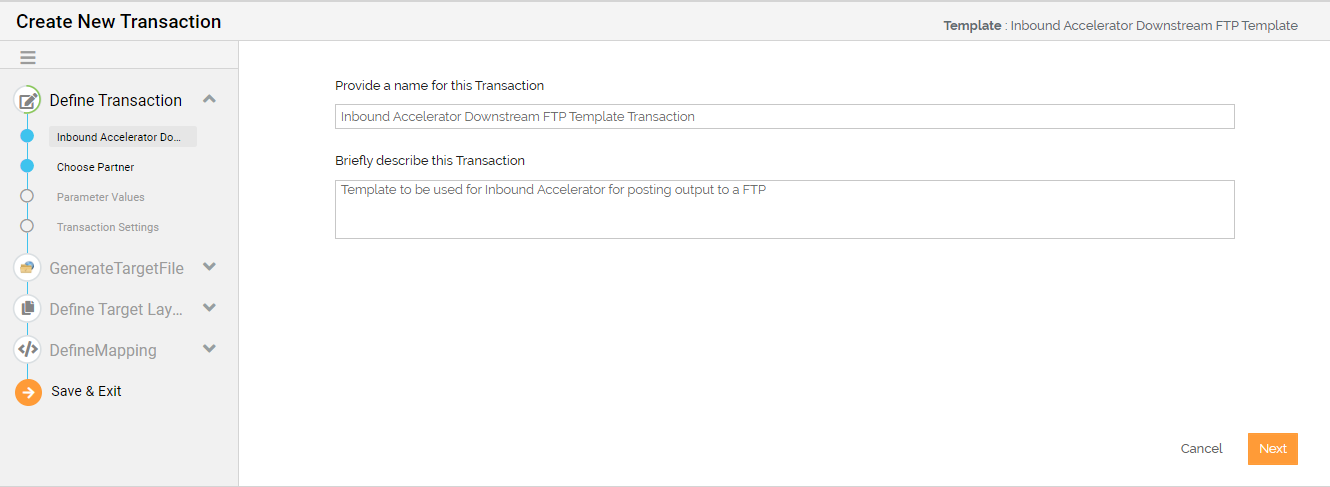
Provide the name and description of the Transaction. The name and description of the Transaction are generated automatically based on the selected Template. You can edit the Transaction name and description that can be up to 48 and 300 characters long.
-
Click Next.
-
Select the partner for whom you are creating this Transaction. All the Partners of the Network(s) to which this Template belongs will be populated in the drop-down list. Additionally, you may add a new partner by clicking on the [+].
-
Click Next.
-
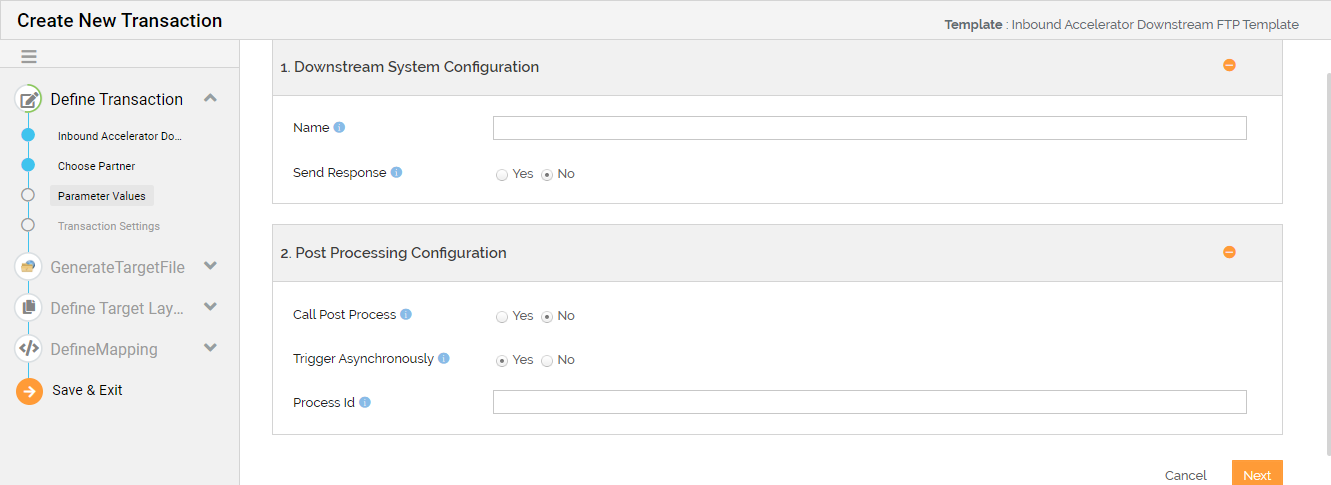
On the Parameter Values screen,
-
Provide the name of the downstream system to be displayed in the dashboard.
-
Select either Yes or No against the Send Response field.
This field is configured to indicate if the downstream system will send a response back. If enabled the status will be left as "In-Progress" and the final status will be posted once a response is received from the downstream system. -
Select either Yes or No against the Call Post Process field.
If this field is enabled, it indicates that the configured post process will be triggered at the end of the processing -
Select either Yes or No against the Trigger Asynchronously field.
If this field is enabled, the configured port process will be triggered parallel to the current processing. -
In the Process Id field, enter the Process Flow Id of the post process that need to be triggered.
-
-
Enter the following details to configure the Transaction Settings.
Field Name Description Contact User
Email id(s) listed here will receive a notification email whenever the Transaction is executed successfully or if there is an error during execution. Multiple email ids are separated by comma.
If Adeptia Connect is running on multiple environments and you want to receive environment name in the emails, then you need to specify the environment name in the relevant property (Account > Settings > Expand Application Settings > Common > Expand Personalization).
When to notify the contact user thru email? Always: Send an email whenever a Transaction executes.
On Error: Send an email if an error occurred during the execution of the Transaction.
Do Not Notify: Select this option if you do not want to receive an email notification for Transaction execution.
Email Notification Format This field is visible only when you have selected Always or On Error option to send the notification to the user.
Select the email notification format that you want to use for notification emails sent to the user for successful and failed transaction.Default: If you select Default, the system will use the default email notification format.
Customized Notification Format: If you select this option, a Custom Error Notification Format field appears. In this field, you can select an existing custom email notification format or create a new one, and use it for email notifications.
-
Clcik Next.
-
Select the FTP account where you want to generate the Target file. You can either use an existing account or create a new one. Click to add a new account.
Click Test to test the connection to your account. -
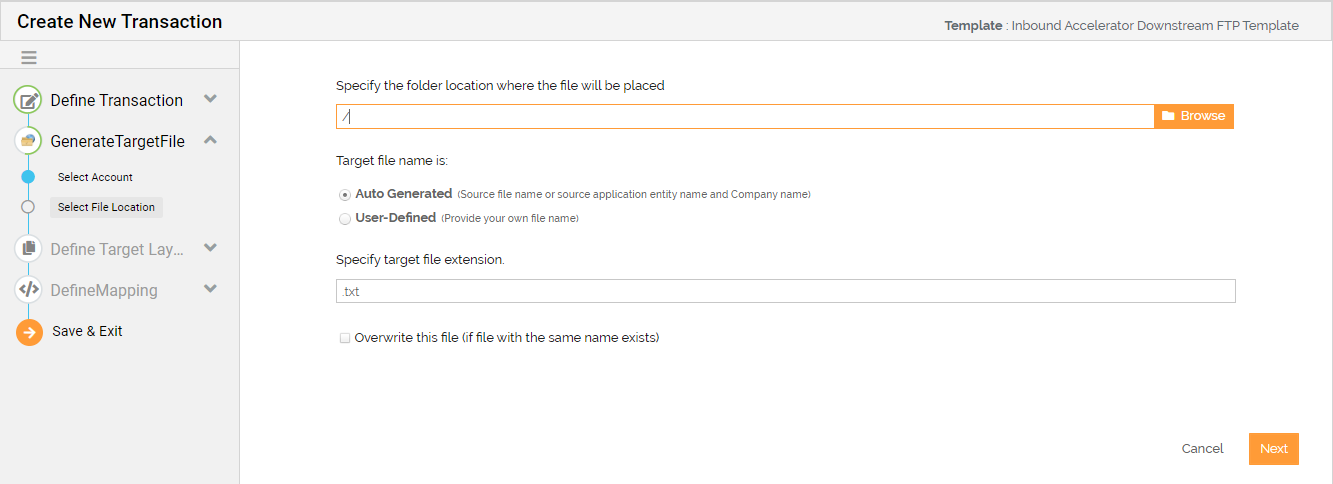
On the Select File Location screen,
-
Provide the folder location from where to pick files.
-
Select Auto Generated if you want the Target file name same as the Source file name or source application entity name and Company name. Else, select User- Defined to provide your own file name.
-
Specify the Target file extension.
This field appears only when the Target file name is Auto Generated. -
Select the Overwrite this file checkbox if you want to overwrite a file with the same name.
-
Click Next.
-
-
On the Define Layout screen,
- Select the format in which the data of the output file should exist from the dropdown.
- Select the Target data layout. You can either use an existing layout or create a new one. Click
 to create a new layout.
-
Click Next to define the mapping.
-
Click Save & Exit to save the Transaction.
After you turn on the Transaction, the Transaction is now listed on the Step 6 screen.
Select the Transaction and Click Next.
-
-
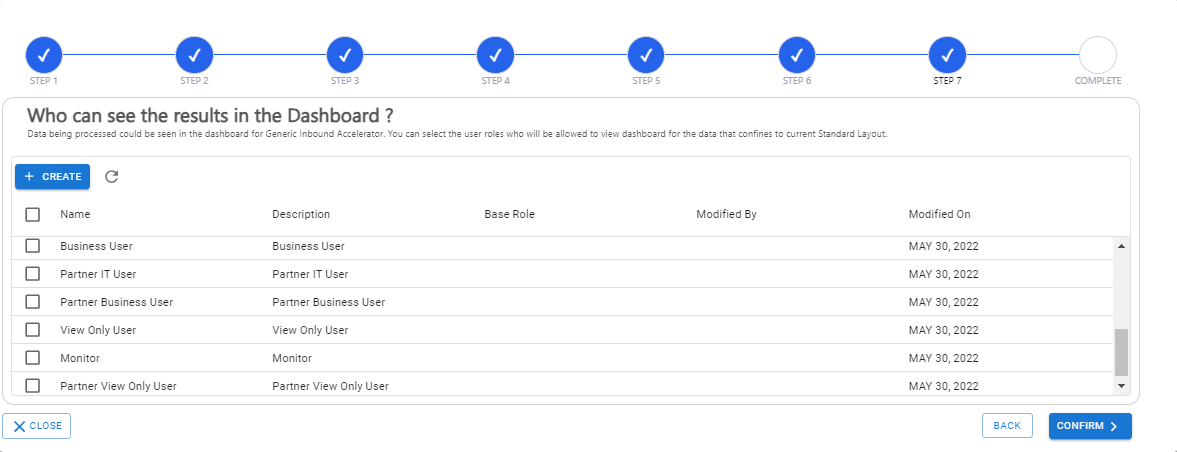
On the Step 7 screen select the user roles who can view the Dashboard. You can either create a new Role by selecting Create or select from the list of existing roles. Click here to learn about how to create a role.
-
Click Confirm.
A confirmation screen displays.