This section discusses how you can upgrade to AC v4.8.
Possible Upgrade path
You can upgrade to AC v4.8 from the following version:
- AC v4.6
- AC v4.6.x
- AC v4.7
- AC v4.7.x
- AC v4.8-beta
Changes in values.yaml
-
The following variables have been added to the values.yaml:
Section in values.yaml Variable Value Description global > environmentVariables WEBAPP_DOMAIN_URL Enter the URL in the format https:<domain> to be used for accessing the application. Ensure that you enter the URL in single quotes, for example global > deploymentmanager > runtimeEnvironmentVariables API_GATEWAY_URL https://ac-api-publisher-gateway (Default value) URL to access API Gateway. -
Added nodeSelector parameter to the following sections in v4.7.1 and above:
- global > deploymentmanager
- global > deploymentmanager > runtime
It allows you to control pod scheduling by targeting specific Kubernetes nodes, enabling better workload placement and cluster resource management.
-
Added the following sections in v4.7.3 and above:
- global > webappGateway > customActuatorSecrets
- global > apigateway > customActuatorSecrets

For other changes in values.yamlfor v4.8-beta compared to AC v4.6.4, refer to this page.
Changes in roles package
In the RabbitMQ Operator roles package for AC v4.8, the following file has been added to the location roles\rabbitmq_operator_roles.
- crds-messaging-topology-operator.yaml
Prerequisites
Ensure that you have met the following prerequisites before you upgrade the application:
-
If you are using MySQL DB, take its backup, and then upgrade its version to v8.4.
If your current application version uses MySQL 8.0 and you want to keep your existing environment intact while performing the upgrade on a different cluster, follow the steps below:
- Provision a new MySQL 8.0 instance and create a namespace for the new environment on the Kubernetes cluster.
- Clone the backend DB and log DB from the existing MySQL 8.0 instance to the new instance.
- Clone all PVs/PVCs to new persistent volumes.
- Upgrade the new MySQL instance from 8.0 to 8.4.
- Update the
values.yamlfile to point to the new DB host and the cloned PVCs. - Install/upgrade using the 4.8.0 Helm chart in the new environment.
By following this approach, your original application version deployment and the old MySQL 8.0 instance will remain intact throughout the process, serving as a rollback target until v4.8.0 is fully validated.
-
Take the backup of the cacerts file present in /shared/truststore folder.
-
Ensure that no Process Flows or Templates/Transactions are in queued or running state.
-
Deactivate the dedicated deployments (if any).
-
Scale down the following microservices' deployment:
- api-publisher-gateway
- event
- listener
- runtime
Pre-upgrade configurations
-
Go to the Adeptia Connect ArtifactHUB page for AC v4.8.
https://artifacthub.io/packages/helm/adeptia-connect/adeptia-connect/4.8.0 -
Click DEFAULT VALUES.
-
On the Default values screen, click
 icon to download the global values.yaml file for AC v4.8.
 -
In the global values.yaml,
-
Update the following configurations:
-
Image Pull Secret
-
Database credentials
-
Docker image URLs as per the repository (applicable in case you are using a private repository to host the Adeptia docker images)
-
-
Ensure that the values for the following variables are set as mentioned in the table below.
Variable Section in values.yaml Value EXECUTE_STATIC_JOB global > static true EXECUTE_MIGRATION_JOB global > migration true -
Set the value for EXECUTE_CLEANUP_JOB in the global > cleanup section to false if both of the following conditions are met:
- You are not switching from non-HA mode of RabbitMQ to HA mode or vice versa.
- Redis is not deployed in your existing environment
-
-
Configure the following variables to delete the Redis StatefulSet if you have Redis already deployed in your existing environment.
Variable Section in the global values.yaml Description Default value EXECUTE_CLEANUP_JOB cleanup - Set the value for this variable to true to enable the deletion of Redis StatefulSet.
- If you set the variable EXECUTE_CLEANUP_JOB to true, ensure that there are no messages
in running or queued state.
true DELETE_REDIS_STATEFULSET cleanup Ensure that the value for this variable is set to true. This deletes the Redis StatefulSet when you have Redis already deployed in your existing environment.
- true - Redis is deployed along with the application.
- false - Redis is not deployed with the application.
true -
If the current version of the application is deployed with RabbitMQ in HA mode and you want to upgrade to Adeptia Connect v4.8 without RabbitMQ in HA mode, perform steps 6(a) and 6(b).
-
Delete the RabbitMQ Cluster by running the following command:
-
Set the values for the following variables under the cleanup section of the global values.yaml file to true to delete the RabbitMQ resources.

Ensure that there are no messages in running or queued state.Variable EXECUTE_CLEANUP_JOB DELETE_RABBITMQ_STATEFULSET DELETE_RABBITMQ_PVC DELETE_RABBITMQ_CLUSTER DELETE_RABBITMQ_CONFIG_SECRET -
If you are switching from non-HA to HA mode of RabbitMQ in AC v4.8, perform only step 6(b).
-
If your environment is already running in HA mode and you are upgrading without changing the mode, perform only Step 6(b).
-
-
In the following sections of the values.yaml file, set the username and password for enabling authentication to download heap dumps. To authenticate using these credentials, ensure that the create parameter in these sections is set to true:
If you do not want to specify credentials for enabling authentication to download heap dumps, set create to false and provide your secret name in the secretName parameter in the above sections. Refer to the table below for details:
Parameter Description createDetermines whether the Helm chart creates a Secret in the target namespace. Set to true(default) for Helm to create the Secret from the username and password you provide. Set tofalseif you want the pods to reference an existing Secret created outside Helm — for example, by HashiCorp Vault, External Secrets Operator, a CI/CD pipeline, or a platform-managed Kubernetes Secret.secretNameThe name of the Kubernetes Secret that stores the credentials. Pods refer to this Secret for authentication. - global > webappGateway > customActuatorSecrets
- global > apigateway > customActuatorSecrets
-
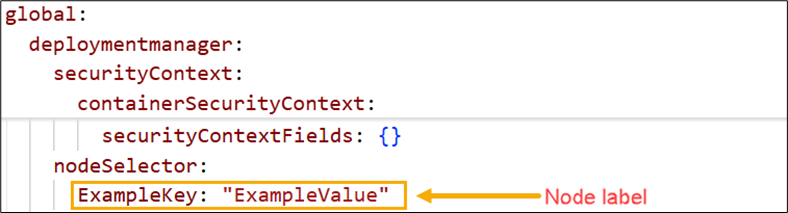
(Optional): To schedule your Deployment Manager or Runtime pods on a specific node, locate the nodeSelector parameter in the respective sections of the values.yaml file and enter the node label as its value.
Refer to the screenshot below for reference.
- global > deploymentmanager
- global > deploymentmanager > runtime
-
Ensure that all the remaining settings, except those discussed in the guide, remain as per the previous configuration while Upgrading to AC v4.8.
Follow the steps given below to upgrade to v4.8:
You can upgrade to AC v4.8 of Adeptia Connect by following the steps given below.
-
On the Helm CLI do the following:
- Run the following command to update the application Helm Repository.
-
Run the following command to upgrade the application.
Where,
ReleaseName is the name of the release.
RepoName is the name of the repo added while deploying the application.
Namespace is the namespace where the Adeptia Connect application is installed.
Post upgrade steps
-
Scale up the microservices deployments that you scaled down before upgrade.
-
Import the certificates that were added manually to the cacerts before the upgrade.
-
Restart all the microservices.
-
Reactivate the dedicated deployments that you had deactivated before performing the upgrade.
-
If you use custom reports in your Process Flows and want to continue using your existing JRXML files to create custom reports in Adeptia Connect (AC) v4.8, follow these steps:
-
Upgrade to or install Jasper Studio v7.0 or later (v7.0.6 is recommended).
-
Open your existing JRXML files in Jasper Studio.
-
Save each file as a new JRXML file.
After saving the files in Jasper Studio v7, the new JRXML files will be ready for use with the upgraded Adeptia Connect v4.8.Any process flows from previous v4.x versions that contain a Custom Report object will fail to execute in Adeptia Connect v4.8.
To resolve this issue, replace the existing Custom Report object with a newly created Custom Report object that uses a JRXML file compatible with Adeptia Connect v4.8.
-