Enabling AI Business Rules feature
AI Business Rules feature helps you to validate your data based on logical conditions defined using plain English. This section discusses the steps to implement this feature.
Prerequisites
- Download and extract the zip containing the following files required for AI Business Rules implementation:
- AIBusinessRules.war
- export_AI_WebForm
- RuleEngineTables.sql
- rulesengine.properties
- Ensure that AIMap resource utilization meets the minimum requirements by specifying the following resource limits and requests in the aimap section of the global values.yaml file for the application.
Steps to enable AI Business Rules feature
-
Prepare a Database
-
Add the required custom properties
The following table lists the custom properties you need to add to the application:
*Custom properties table:
*Custom property name Description abpm.services.aimap.adeptiaai.ruleenginedb.url Enter the URL of database you created for holding the AI Business Rules related tables in the following format: mysql+mysqlconnector://<Domain name>:3306/<DB name> abpm.services.aimap.adeptiaai.ruleenginedb.username Username of the database. abpm.services.aimap.adeptiaai.ruleenginedb.password Password to access the database. S****teps to add a custom property in the application

The steps given below help you add one custom property. To add multiple custom properties, you need to repeat these steps for each custom property you want to add. For the list of properties, refer to the Custom properties table given above.
-
Log in to Adeptia Connect as an Admin.
-
In the application, click Account > Settings.
-
In the left panel, expand Custom.
-
Select Settings.
-
Click ADD Custom Property.
-
On the Add Custom Property window,
- In the Group field, enter Rule_Engine as the Group name.
- In the Name field, enter a custom property name, for example, abpm.services.aimap.adeptiaai.ruleenginedb.url.
- In the Value field, provide an appropriate value for the property. For description of the custom properties, refer to the Custom properties table.
- In the Microservice field, select AIMap as the microservice for which you want to create this property.
- In the Description field, enter a description for the property.
-
Click Save.

After you have added all the properties, restart the aimap microservice. -
Update and deploy the rulesengine.properties file
- Open the rulesengine.properties file and update it by following the steps given below:
- In the jdbc.url variable, provide the URL and the name of the database you created for AI Business Rules.
- In the jdbc.user variable, provide the database username.
- In the jdbc.pass variable, provide the database password.
- Provide the values for the following variables:
- AI_Oauth_ClientId
- AI_Oauth_ClientSecret
- AI_Oauth_Scope
- AI_Oauth_TokenURI
- In the AIServerURL variable, provide the AI Service URL.
- Provide Adeptia Connect URL, for example, https://app.adeptia.com, in the following variables:
- ExecutionRule
- CONNECT_URL
- Place the rulesengine.properties file in the webapps folder.
- Restart the portal microservice to bring the changes into effect.
- Open the rulesengine.properties file and update it by following the steps given below:
-
Deploy the export_AI_WebForm zip
- Log in to Adeptia Connect as an Admin.
- In the application, import the export_AI_WebForm zip using the Solution Promotion wizard.
-
Deploy the AIBusinessRules.war file
- In the application, upload the AIBusinessRules.war file to the target environment by navigating to Configure > CUSTOM LIBRARIES > Web Apps.
- Restart the portal microservice to bring the changes into effect.
-
Activate the deployed AI Business Rules webform
-
Update the ‘AIDocs_Service_BusinessRules’ Consumer
- In the application, open the AIDocs_Service_BusinessRules’ Consumer activity.
- In the URL field, replace <Environment DNS> with the actual application domain name, for example, app.adeptia.com.
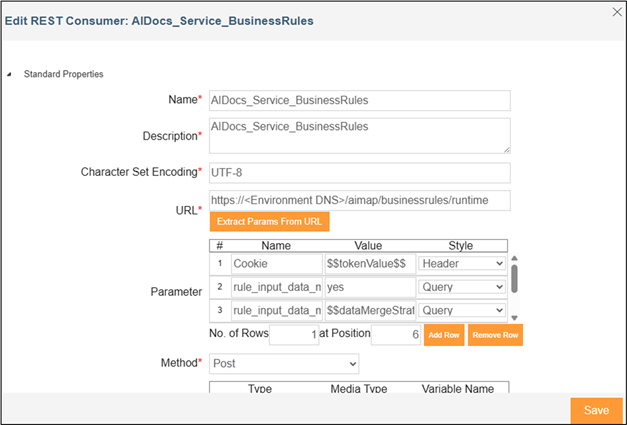
- Click Save.