Templates and Transactions Parameters
While creating a template, you may need to define template and transaction parameters based on your need. This document guides you on how to use the different types of parameters. It also describes how these parameters function with different settings.
This page also discusses the characteristics of the various fields on the Add Template/Transaction Parameters screen and their effects on the parameters' representation.
On the following screen, when you click Add Parameter, it guides you to the page that lets you add the template or transaction parameters.
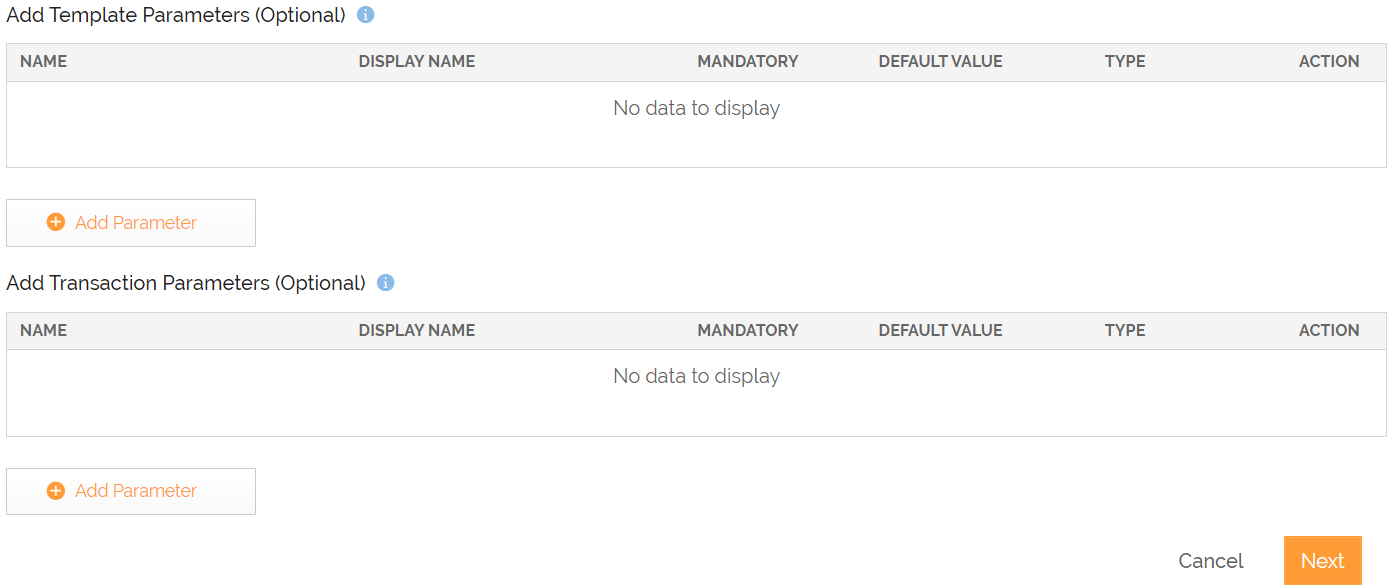
 | Defining parameters is an optional step during template creation. |
Below is the screen that asks you for the details described in the table that follows to add a parameter.
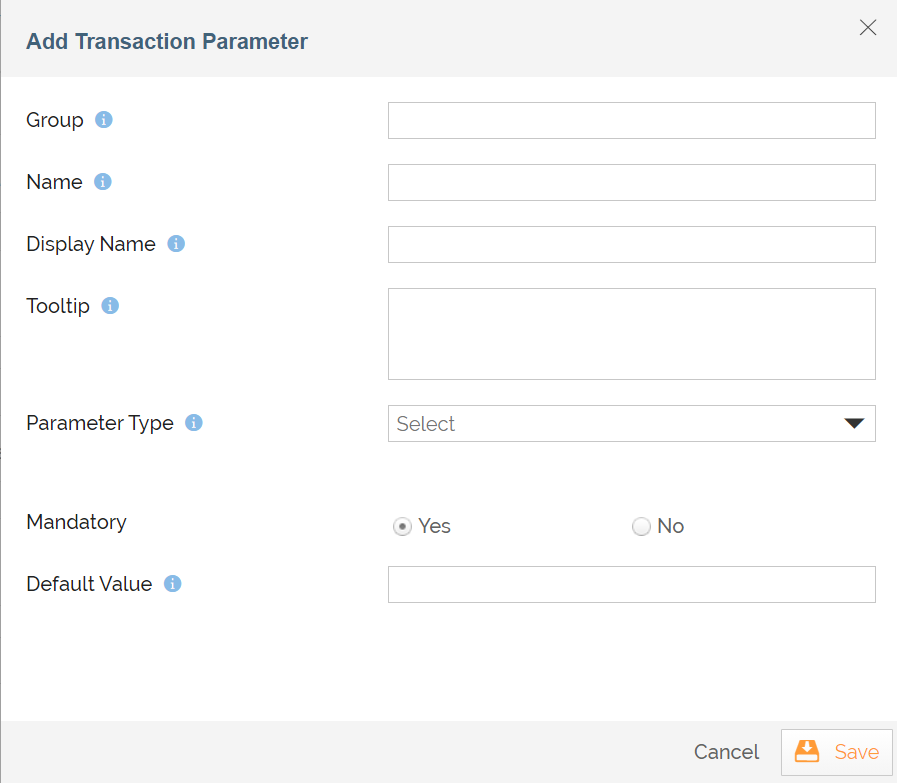
Fields | Description |
|---|---|
| Group | A unique name to identify a group. |
| Name | Name of the parameter. |
| Display Name | Display name for the Parameter. This display name will be visible instead of the Parameter's actual name on the Parameter Values page. |
| Tooltip | Message that you want to show as a tooltip for the Parameter. |
| Parameter Type | Type of the input parameter to be received from the Partner. |
| Mandatory | The parameter may be mandatory or optional. By default, the parameters are mandatory. |
| Default Value | Default value of the parameter. |
Fields' details explained
As you set the values for some of these fields, for example, Display Name, and Tooltip, the corresponding changes are reflected in several pages related to the templates and transactions. You may also need to do some additional settings in case of some specific type of parameters, for example, Combo and Text. The following sections discuss these fields, their possible values and settings, and the changes they bring into effect.
Display Name: The name you enter in this field appears on the following pages:
- Add Template Parameters
- Add Transaction Parameters
- View Template
- View Transaction
- Parameter Values
- Template Parameter Preview
Tooltip: The message you enter in this field can be seen as a tooltip for the parameter in the following pages:
- Parameter Values
- Template Parameter Preview
Parameter Type: Depending on the Parameter Type you have selected, you may have to define some additional fields/options or settings while defining a parameter. The following points underline the characteristics of a set of some parameter types in terms of options and settings.
- Below is the set of validation fields you encounter if you select the parameter types given in the table that follows. You can perform a validation check on the parameters using these fields.
- Maximum Length - Enter the maximum length (in number) allowed for the parameter.
- Pattern - Set the pattern for the Parameter. It should be defined in a regular expression.
- Test Pattern - Check the validity of the expression in the Pattern field by giving a value in this field.
Parameter Types | Validation fields | ||
|---|---|---|---|
| Max Length | Pattern | Test Pattern | |
| Combo | No | No | No |
| Multi Select Combo | No | No | No |
| Password | Yes | Yes | Yes |
| Text Field | Yes | Yes | Yes |
Text Area | Yes | Yes | Yes |
| Radio Button | No | No | No |
| Date Field | No | No | No |
| Checkbox | No | No | No |
| Yes | No | No | |
| URL | Yes | No | No |
| Number | No | No | No |
| Decimal Number(Float) | No | No | No |
| Pattern and Test Pattern fields' values should be a regex written in JavaScript only. |
-
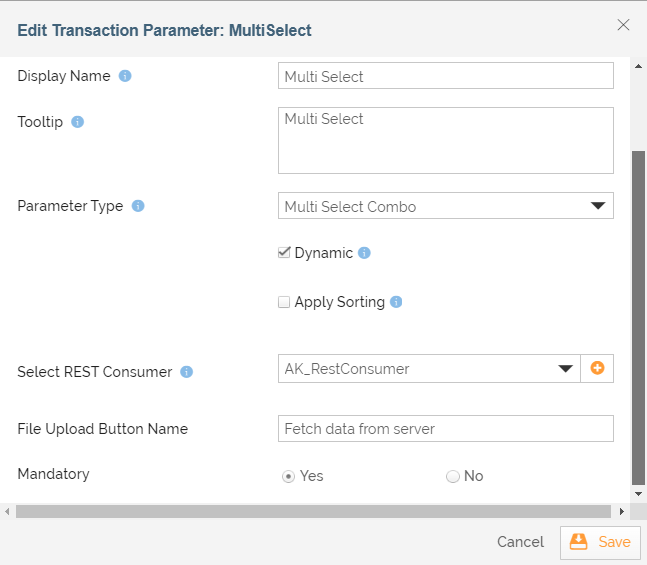
If you select the Combo or Multi Select Combo as the Parameter Type, you can provide the value(s) either manually by entering a list of options in the Value field or dynamically by calling a REST Consumer.
To call a REST Consumer to populate the values, do the following:-
Select the Dynamic checkbox.
-
In the Select REST Consumer field, select a REST Consumer from the list. You can also create a new REST Consumer by clicking the
 sign.
sign.- In case of Combo, the selected REST Consumer should be configured to use the GET method and Basic Authentication only.
- In case of Multi Select Combo, the selected REST Consumer should be configured to use the GET or POST method, and Basic Authentication only.
-
In the Default Value field, select a default value for the parameter (Combo field).

This field appears only when you select Combo as the Parameter Type. -
Selecting Apply Sorting if you want to apply sorting on the retrieved values.
-
In the File Upload Button Name field, provide a name to the button that helps you populate the values in the Multi Select combo parameter while you create the Transaction.
If the selected Parameter Type is Multi Select Combo, and the REST Consumer uses the POST method, you need to follow the steps given here while defining the Transaction to populate the parameter values.

- The File Upload Button Name field is optional, and it appears only when you select a REST Consumer that uses the POST method to populate the values in the Multi Select combo parameter.
- If you do not provide a value to this field, the system provides the name Populate to the button.
-
-
If you select the CheckBox as the Parameter Type, you can select any of the following three values in the Select CheckBox Value field. The default value for each of the selected options is Unchecked. You can change the default value to Checked based on your requirement.
- true/false
- on/off
- 1/0
REST Consumer response
The response received from the REST call in case of a Combo or Multi Select Combo parameter is always in the JSON format. Below is an example of the JSON response that you receive.
Sample JSON Response
Adding Validation to a Transaction Parameter
You can add validation to a transaction parameter (field) to define a rule for dynamically performing a resultant action on another field (target field). The rules work only when there is a change in the value (defined while defining the rule) of the field to which you have added the validation. For example, you can define a rule that a change in the value of a field modifies another field's default value and makes the field non-editable.
You can use the following attributes of a target field to have a resultant action on it when there is a change in the value of the field to which you have added the validation.
| Attribute | Value | Description |
|---|---|---|
Mandatory | Yes/No | Select Yes to make the field mandatory. |
Visibility | Yes/No | Select Yes to make the field visible. |
Editable | Yes/No | Select Yes to make the field editable. |
| Default Value | <User defined> | Enter a default value |
You can add validation either by using the GUI or API.
- Adding validation using GUI
- Adding validation using API
Adding validation using GUI
Follow the steps given below to add validation to a transaction parameter using GUI:
On the Define Parameters screen, Add Transaction Parameters (Optional) section,
-
Select the parameter (field) to which you want to add validation and click More > Add Validation.
-
On Add Validation for field on change screen, in the Rule Definition Criteria, select GUI.
-
In the Provide field value on which the rule will be applied field, select/provide the value(s) based on which you want to perform an action on a field.
You can select/provide up to four values in this field.
-
In the Hide Group field, select the group that you may want to hide.
-
In the Select target field(s), select the field(s) on which you want to perform a resultant action.
You cannot select the field to which you have added the validation as a target field. Based on the field you select, you get the field attributes as shown in the table below.
Target Fields Fields' Attributes - Text
- Text Area
- URL
- Number
- Decimal Number
- Date
- Mandatory
- Visibility
- Editable
- Default Value
- Combo
- Mandatory
- Visibility
- Editable
- Value(s) – To select and list the required values.
- Default Value – To set a default value out of the values you entered in the Value(s) attribute.
- Radio Group
- Visibility
- Value(s) – To select and list the required values.
- Default Value – To set a default value out of the values you entered in the Value(s) attribute.
- Checkbox
- Visibility
- Default Value
-
Define the attributes to set a rule for the target field based on your requirement.
-
Click Save.
Adding validation using API
Follow the steps given below to add validation to a transaction parameter using the API:
On the Define Parameters page, Add Transaction Parameters (Optional) section,
-
Select the parameter (field) to which you want to add validation and click More > Add Validation.
-
On the Add Validation for field on change screen, in the Rule Definition Criteria, select an option API.
-
In the Select REST Consumer, select a REST consumer account. You can also create a new REST Consumer by clicking the
 sign.Your REST API must return the response in the format given in the example below. The resultant action on the target fields occurs as per the response. The response is based on the validation field and its value passed via the parameters fieldName and fieldValue to the REST API.
Where,
- validation – Contains the target fields, separated by comma, that are defined as mandatory, non-mandatory, editable, non-editable, visible, or invisible, and the names of the hidden groups.
- values – Contains the names of the target fields, their values and default values that you want to see after the validation.
-
Click Save.
Parameters preview
After you have defined the parameters, you can preview them by clicking the  icon on the parameter definition page.

Manage a parameter
Managing a parameter involves a range of options designed to give you comprehensive control and flexibility. To manage a parameter, click More and choose from the following options based on your requirement:
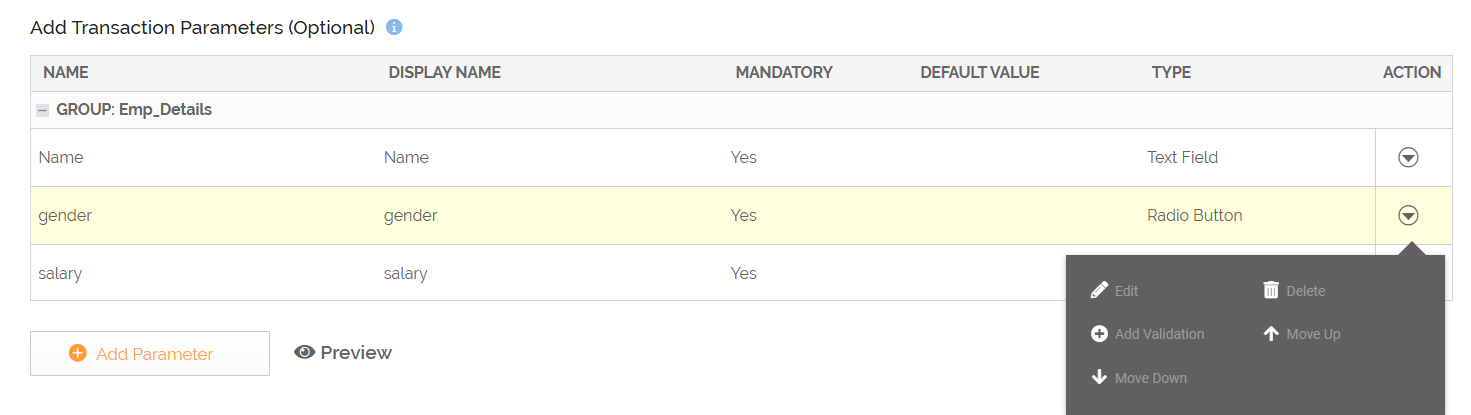
- Edit: Adjust existing settings or configurations of a parameter.
- Delete: Remove parameters that are outdated or no longer necessary.
- Move Up: Reposition a selected parameter one level higher in the list within its current group. To move the entire group one level higher, move up the first parameter in the group.
- Move Down: Reposition a selected parameter one level lower in the list within its current group. To move the entire group one level lower, move down the last parameter in the group.
- Add Validation (available only for Transaction parameters)