JSON Layout
JSON (JavaScript Object Notation) is a lightweight data-interchange format. The JSON layout defines the procedure to read data from and write data to a JSON file.
Steps to create a JSON Layout
-
Click Configure > LAYOUTS > JSON.
-
Click **CREATE JSON Layout.
** -
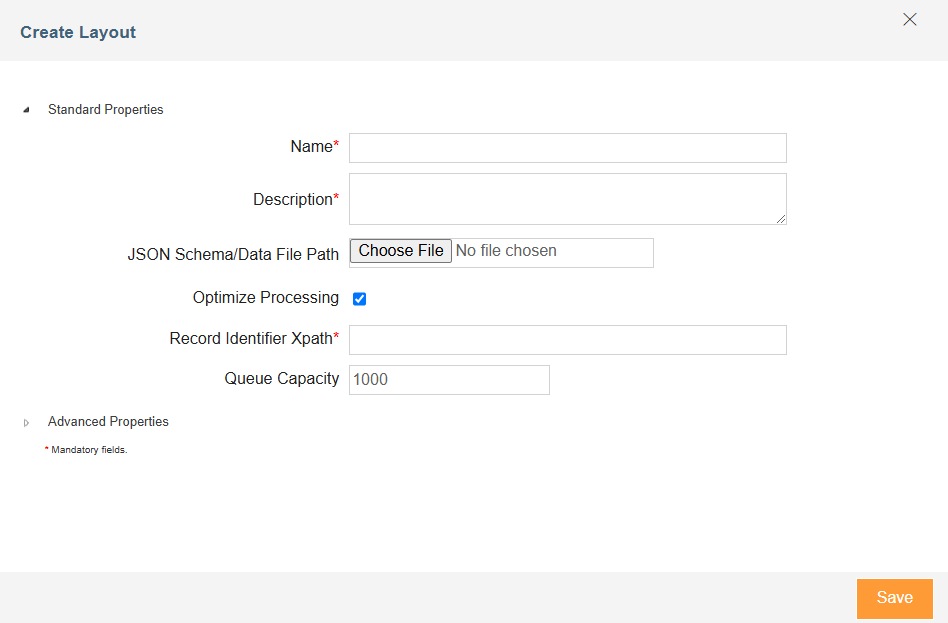
On the Create Layout window, type the name and description of the new JSON layout in the Name and Description fields respectively.
-
Click Choose File in the JSON Schema/Data File Path field to upload a JSON specification file or a JSON data file.

The supported JSON Schema specification versions are:
- Draft 04
- Draft 07
- Draft 2019-09
- Draft 2020-12
-
Select Optimize Processing in case you want to optimize the processing of a high volume of records
- Selecting the Optimize Processing checkbox changes the records processing strategy to Producer-Consumer pattern.
- This option is useful only when you use the JSON Layout at the Target.
-
In the Record Identifier Xpath field provide the xpath of the element that you want to use as the record identifier.

- It is a mandatory field.
- It specifies the JSON node from which records will be extracted for processing. Additionally, if the Validation checkbox is selected, any record with a validation error will be excluded from being sent to the target.
- Ensure that the Record Identifier Xpath does not start with the root element. For example: /policy instead of /Root/policy
-
In the Queue Capacity field, enter the maximum number of records that the Queue, lying between the Producer and the Consumer, can hold at a time.
-
Select the Validation checkbox if you want to validate the correctness of the JSON data within the specification file.
The Validation check box is enabled only if you have uploaded a JSON specification file.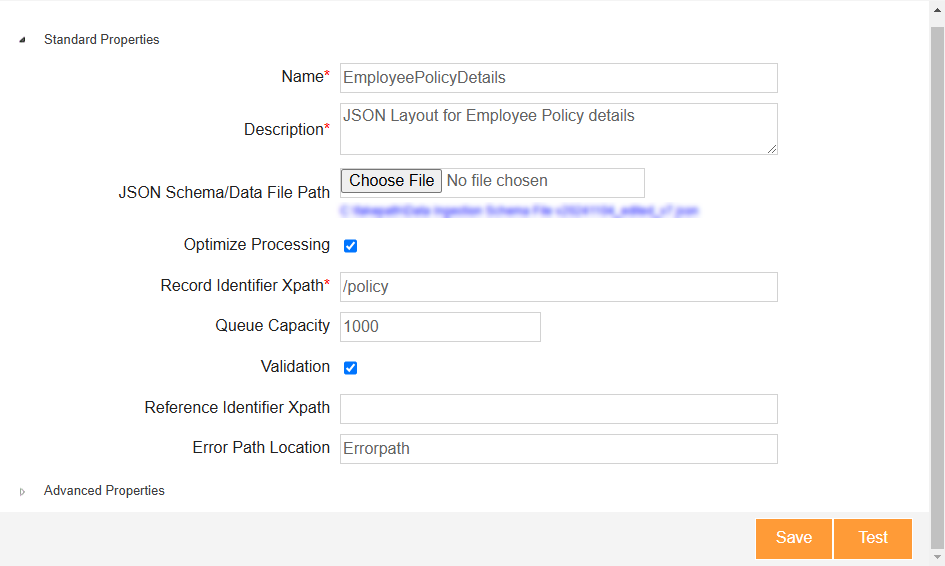
- If validation fails, the impact on the Process Flow that uses the layout depends on the configuration of the Error Records field (found under Activity Properties of the JSON Layout > GENERAL > Error Records).
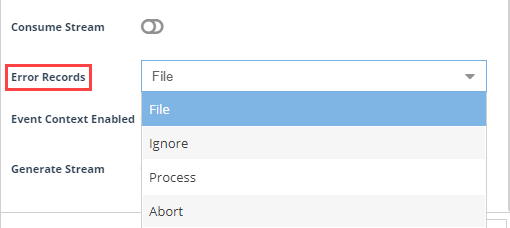
The Error Records field has the following options: - File - Error records will be stored in the repository folder without aborting the Process Flow.
- Ignore - Validation errors are ignored, allowing the Process Flow to continue. Error records will not be saved in the repository folder.
- Process - Continue processing valid records while providing an error stream indicating validation errors in a separate error file.
- Abort - Aborts the Process Flow upon encountering validation errors. Error records will be stored in the repository folder.
- If validation fails, the impact on the Process Flow that uses the layout depends on the configuration of the Error Records field (found under Activity Properties of the JSON Layout > GENERAL > Error Records).
-
If you have selected the Validation checkbox, provide details for the following optional fields:
-
In the Record Identifier Xpath field provide the xpath of the element that you want to use as the record identifier. By using this identifier, you can ensure that any record with a validation error is not sent to the Target.
Ensure that the Record Identifier Xpath does not start with the root element. For example: /policy instead of /Root/policy. -
In the Reference Identifier Xpath field, provide the unique element xpath relative to the record identifier if you want to include a reference identifier in the error records file.
-
In the Error Path Location field, provide a name for the wrapper section in the error file that will contain all the error records.
-
-
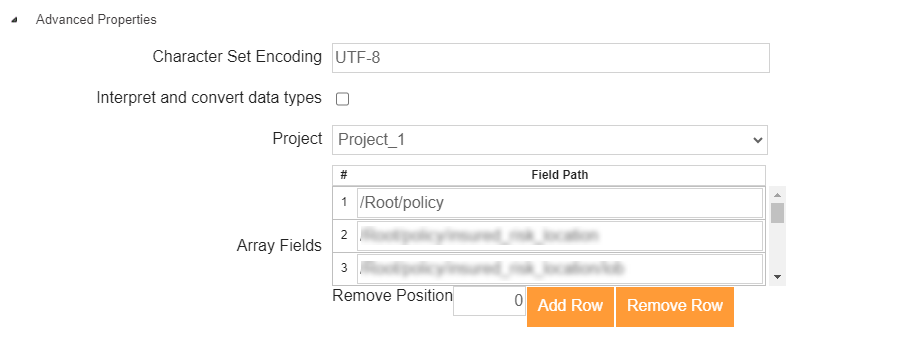
Expand Advanced Properties to view the advanced properties of JSON layout.
-
Define the character-set encoding for your JSON layout. The available options are UTF-8, UTF-16, UTF-32, and ISO-8859-1.
-
Select the Interpret and convert data types check box if you want to convert the data from one file format to another.
-
Select the project from the drop-down list of Project.
-
In the Array Fields section, enter the xpath of the array fields in the Field Path textboxes. This ensures that the corresponding field at the destination is an array even if the data from the source contains only a single record in the array field.
- The field path in the Array Fields is automatically populated by the application.
- You can add the rows to accommodate for additional xpaths that you may want to enter by clicking Add Row. To remove a row:
- In the Remove Position field, enter the row position value.
- Click Remove Row.
- The field path in the Array Fields is automatically populated by the application.
-
Click Save to save the JSON layout.
You can test the JSON Layout using  . Refer to this page for detailed information on testing a Layout.
Retaining the special characters in a JSON Layout
You can retain the special characters, for example, \n,\r, in a JSON data file by configuring the property **abpm.connect.jsonschema.retainSpecialCharacters.
**
To set this property, follow the steps given below:
- Go to Account > Settings.
- Expand Microservice Settings, and select Runtime.
- Expand Schema Property category.
- In the property, abpm.connect.jsonschema.retainSpecialCharacters, enter the special characters (comma separated) that you want to retain, for example, \n,\r.
- Click Update.
|
|