File Event
The File Event enables you to specify when and how frequently a process flow should be executed based on either the creation of a new file, or existence of a file(s) in a pre-defined location, or upon its modification.
Steps to create a File Event activity
-
Click **Configure > EVENTS > File Event.
** -
Click **CREATE File Event.
** -
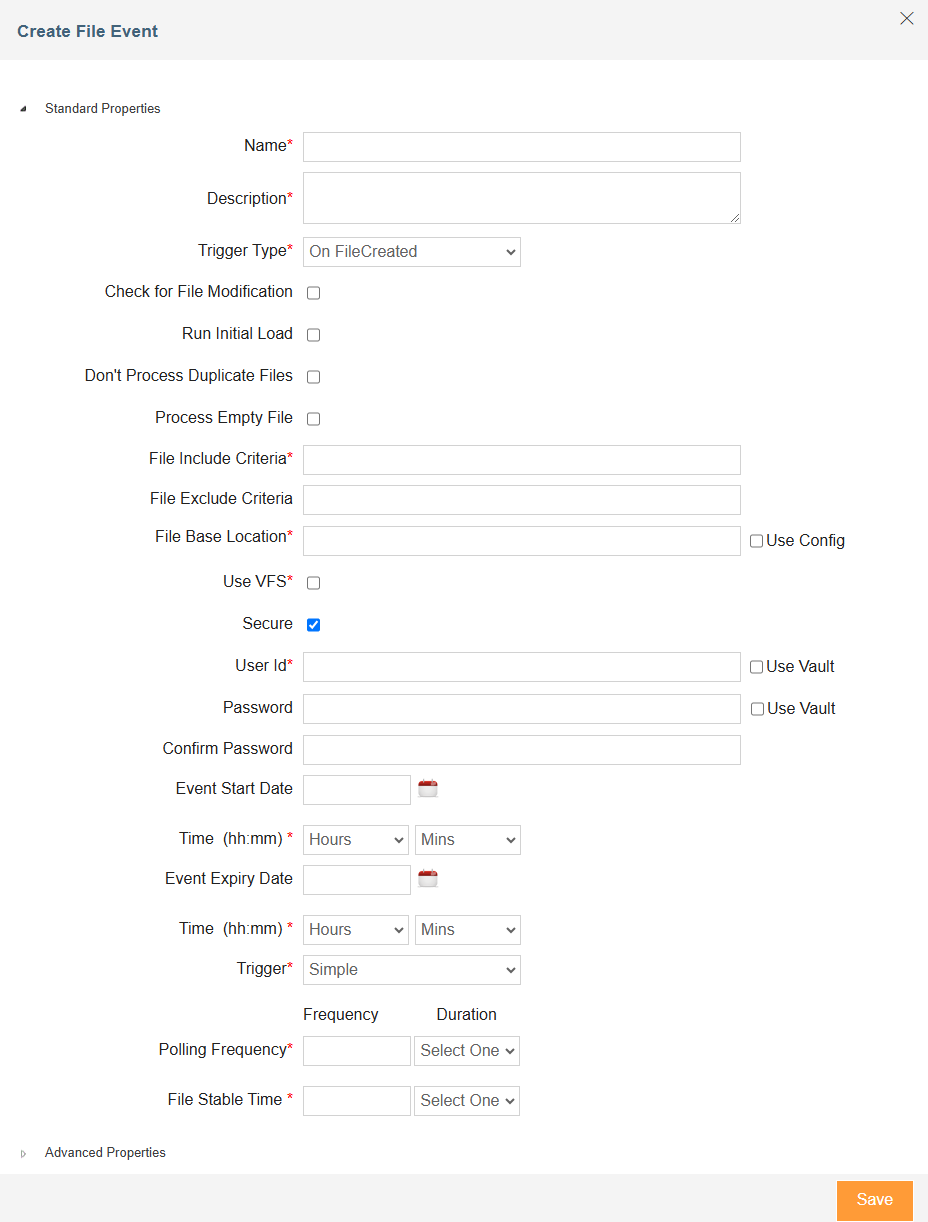
On Create File Event screen, enter the name and description of the new File Event in the Name and Description fields respectively.
-
Select the trigger type from the Trigger Type drop-down list. The available options are On FileCreated, On FileExists, and On FileModified.
Trigger Type Selection
Description
On FileCreated
To configure the file event to check for the creation of a new file(s).
On FileExists
To configure the file event to check for the existence of the file(s).
On FileModified
To configure the file event to check for any modification in the file(s).
-
Select Check for File Modification check box if you want to process the files that are modified after creation. This option is enabled only if On FileCreated option is selected in the Trigger Type drop-down list box.
-
Select Run Initial Load check box if you want to process the files that are created when the event is not active. This option is enabled only if On FileCreated option is selected in the Trigger Type drop-down list box.
After the activation of the event, for the first time, the system processes all the files that exist in the base folder location, and for subsequent activations, only the unprocessed files are processed each time.
-
Select Don't Process Duplicate Files check box if you don't want to process the same file again.
-
Select Process Empty Files check box if you want to run the event even when the input file is empty.
-
In the File Include Criteria field, enter the file name that the file event needs to verify.
-
In the File Exclude Criteria field, enter the name of file that the file event does not need to verify. For example, if you enter *.txt as a value for the File Include Criteria field, but don't want the two files – Gdata.txt and Gdata1.txt – to be verified by the File Event, enter Gdata.txt and Gdata1.txt (separated by a comma) as the value for the File Exclude Criteria field.

To specify multiple files in the File Include Criteria and File Exclude Criteria field, you can use regular expressions. -
In the File Base Location field, provide the path of the file ( for example, C:/Gmdata) or select the Use Config checkbox to dynamically fetch it from a Git repository at runtime through a variable.
-
Select the Secure check box if the File Event is secured, that is, username and password are required to access it.
-
Follow the steps below based on whether you are using Hashicorp Vault to fetch the secrets (credentials) or you want to enter the secrets manually.

To use Hashicorp Vault, you must enable Config Management feature and you may also need to do project mapping. For more details, refer to this page. -
To fetch the secrets from the Hashicorp Vault, do the followings:
You can choose to use Hashicorp Vault for all or a specific field that need to contain secret.
-
Select the Use Vault checkbox if you want to use Vault for retrieving the User Id.
-
In the User Id field, enter the variable in the following format:**${Vault:<Key1>}**Where, <Key1> is the key assigned to the username in the Hashicorp Vault.
Each secret is maintained as a key-value pair in Hashicorp Vault. 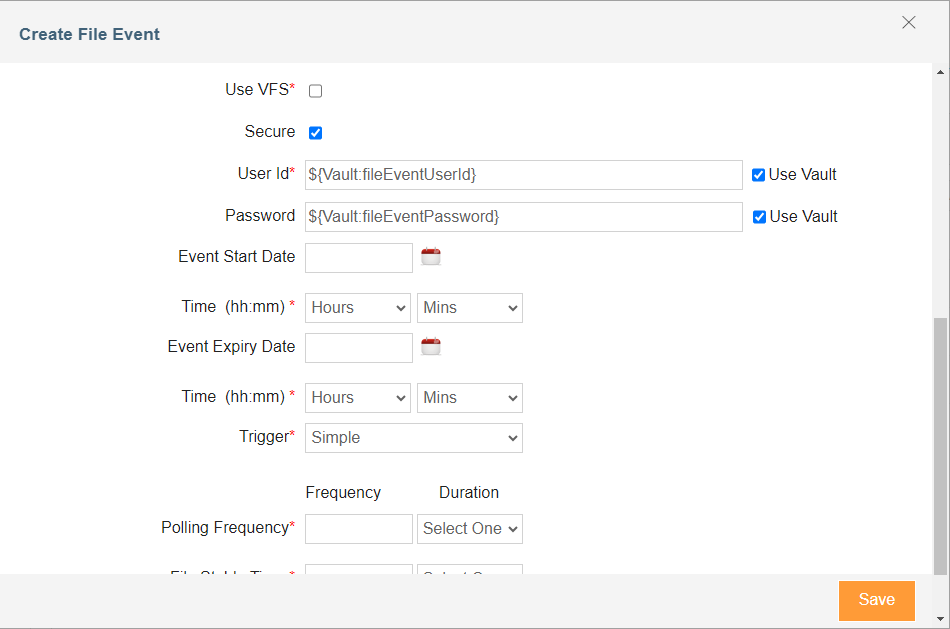
-
Select the Use Vault checkbox if you want to use Vault for retrieving the password.
-
In the Password field, enter the variable in the following format:**${Vault:<Key2>}**Where, <Key2> is the key assigned to the password in the Hashicorp Vault
-
-
To enter the secrets manually, do the followings:
- In the User Id field, enter the username.
- In the Password field, enter the password.
- In the Confirm Password field, re-enter the password. This is applicable only when the specified file is located on a remote machine.
-
In the Event Start Date field, provide the date from which the file event will start triggering. The date must be in mm/dd/yyyy format.
-
Select the start time from the Time drop-down list.
-
In the Event Expiry Date field, provide the date on which file event will stop triggering.
The date must be in mm/dd/yyyy format. -
Select the expiry time from the Time drop-down list.
-
Select the type of trigger from the Trigger drop-down list. Following are the options:
By default, Simple is selected. This triggers the File event as per the defined polling frequency.
If you select Simple, do the followings:If you select Cron, do the followings:
-
Simple
-
Cron
-
In the Polling Frequency field, provide the time interval at which the file event will check for the arrival of any file or modification of an existing file .
-
Select the unit of time (seconds, minutes or hours) from the Duration drop-down list.
Adeptia recommends that you use the Polling Frequency of more than 60 seconds. -
Select the days of the week on which the event should fire from the Firing Days drop-down list. Following are the available options:
Days
Description
All Days
The event will fire on all days (Mon to Sun) of the week
Business Days
The event will fire from Monday to Friday excluding holidays
Week Days
The event will fire from Monday to Friday including the holidays
-
Define the frequency of execution (in Cron Expression) in the Firing Schedule. For information about Firing Schedule, click Help or refer to Cron Expression.
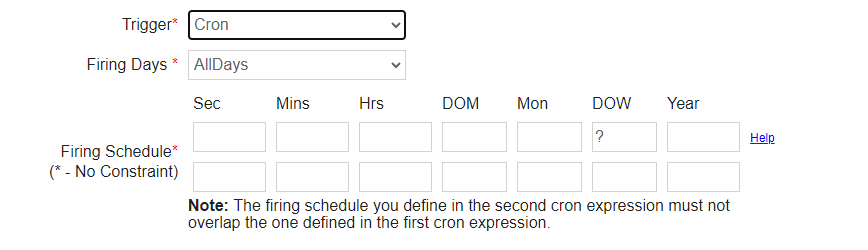
- It is mandatory to define the first cron expression, if you have selected cron as a Trigger type. For example, if you have set a File Event to run every 5 minutes from Monday to Sunday, you can set the cron expression as "0 0/5 * ? * MON, TUE, WED, THU, FRI, SAT * ".
- You may make use of the second cron expression to define another condition or address a condition supplementary to the first one. For example, if you have set a File Event to run every 5 minutes from Monday to Sunday, but do not want the same event to run from 12 AM to 12 PM on Sundays, the second cron expression can be defined as "0 0/5 13-23? * SUN * ".
- The firing schedule you define in the second cron expression must not overlap the one defined in the first cron expression.
-
-
Provide the file stable time in the File Stable Time field, and select the duration from the drop-down list.
- This is the wait time given for the file to get stable. Event waits for the given time before getting fired.
- This option is applicable for On FileCreated and On FileModified Trigger Type. The trigger will wait for the specified time for the file to become stable.
-
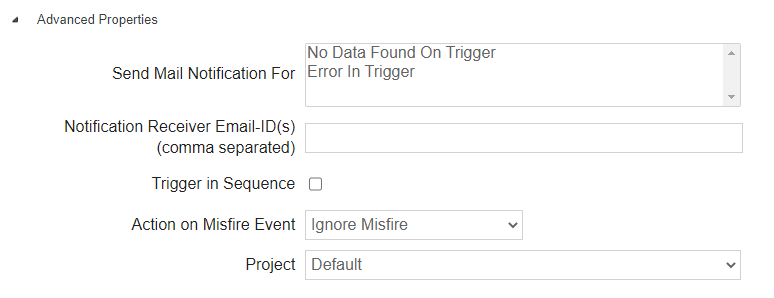
Click Advanced Properties to expand the hierarchy. All the fields in the Advance Properties section are displayed.
-
In the Send Mail Notification For field,
- Select No Data Found On Trigger if you want to send email notification when the file event doesn't find any data when triggered**.**
- Select Error In Trigger if you want to send email notification if any error occurs when the file event triggers**.**
-
Enter the recipient's email address in the Notification Receiver Email-ID(s) field. You can add multiple email addresses by adding comma after each email address.
-
Select Trigger in Sequence checkbox to trigger the event in sequential manner. If you do not select the Trigger in Sequence checkbox, the associated event will trigger concurrently.
-
If you want to enable misfire handling for your JMS event, select Run Once from the Action on Misfire Event drop-down list. If you do not wish to enable misfire handling for your file event, select Ignore Misfire.
The Run Once option will run only one collective instance of all the misfires for a particular event. Whereas, the Ignore Misfire option will not run a misfired event. The default value for Action on Misfire Event field is set to Run Once for all of the earlier events.
-
Click Save.
The File Event gets listed on the File Event Manage page.- You can sort the File Events listed on the File Event Manage page by clicking
 next to the required column and then selecting Sort Ascending or Sort Descending as per your need.
 - You can also hide or show a column on the File Event Manage page. To do so, click next to a column and then select Columns to choose from the following list:
- Actions
- ID
- NAME
- DESCRIPTION
- PROJECT
- OWNER
- MODIFIED
- Actions
- You can sort the File Events listed on the File Event Manage page by clicking
Using regular expressions
You can use regular expressions described in the following table when you want to specify more than one file in the File Include Criteria and File Exclude Criteria field. For example, if you enter h*/*.txt in the File Include Criteria field and C:/Gmdata in the File Base Location field, it will search for all .txt files that start with h inside all the directories under C:\Gmdata.
Expression | Description |
|---|---|
*.* | For all the files having any extension |
* | For all the files in a directory |
a*.txt | For the file names that start with a and have .txt as their extension, for example, arch.txt |
a??????.txt | For the file names that start with a and followed by six more characters and have .txt as their extension, for example, archive.txt |
a[1-9] | For a1, a2 ,a3 …………..a9 |
b[aiu]t | For bat, bit, or but |
a.txt, a.doc | For two files named as a.txt, and a.doc |
| If more than one file is specified in the File Include Criteria field, the process flow will trigger for each file. |