Database Info
You can use Database Info activity to specify the Server URL (JDBC URL), and the type of authentication (Basic or Kerberos) to access the database. Server URL points to a specific database on a specified database server. There is no standard for Server URL. Every JDBC driver uses a slightly different syntax. For example, a Server URL for a MySQL database using the com.mysql.jdbc driver might look like this:
jdbc:mysql://localhost/databaseName
Database Info uses database driver to connect to the specified Database Server.
Prerequisites
Ensure that you have created a Database Driver activity before creating Database Info Activity.
Steps to create Database Info
-
Click Configure > ACCOUNTS > Database Info**.**
-
Click ********CREATE Database Info.
-
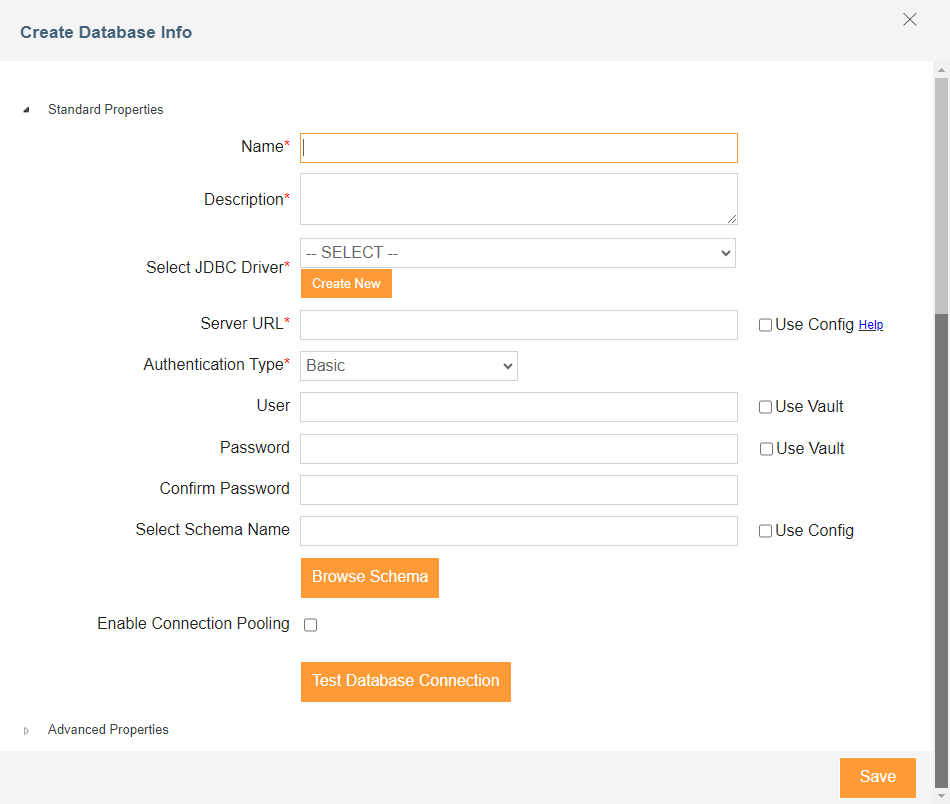
On Create Database Info window, enter the name and description of the new Database Source in the Name and Description textboxes respectively.
-
Select an existing JDBC database driver activity from the Select JDBC Driver drop-down list.
To use a new JDBC database driver activity, click Create New.
For information on how to create a database driver activity, refer to Creating Database Driver.
-
Enter the Server URL. Click Help displayed adjacent to the Server URL text box to get help in defining the Server URL.
The URL format for SQL and MySQL are given below:-
SQL database: jdbc:sqlserver://<hostname>:<port>;database=<database name>;encrypt=true;trustServerCertificate=false;authentication=ActiveDirectoryPassword;
-
MySQL database: jdbc:mysql://<hostname>:<port>/<database name>?sslMode=VERIFY_IDENTITY&fallbackToSystemKeyStore=false
-
-
Select the type of authentication you want to use in the Authentication Type field. The available options are Basic, Kerberos With Keytab, and Kerberos With Service Account. .
Based on the type of authentication you select, enter the values for the fields described in the following table:Basic or Kerberos With Service Account
Field Description User The username of the database server. Password The password for the username of the database server. Confirm Password The password for the username of the database server to confirm. Kerberos With Keytab
Field Description Kerberos Configuration Kerberos configuration information.
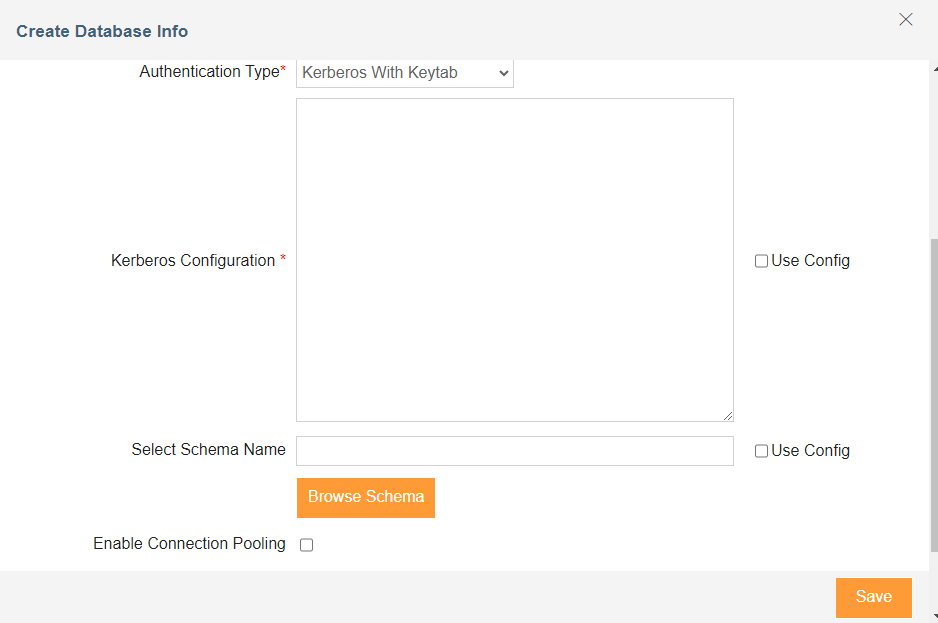

Enter each Kerberos configuration parameter in a new line as a key value pair, for example,
useKeyTab=true
debug=true
For more details on Kerberos Configuration parameters, refer tothis document.<ch:anchor></ch:anchor>

To make this Kerberos configuration work, ensure that you:
- Set the storeKeyand isInitiator Kerberos configuration parameters totrue.
- Add the propertyallow_weak_crypto under [realms] and [libdefaults] tags in krb5.conf file located at /shared, and set its value to true.
For the fields that have Use Config checkboxes available against them, you can fetch the values from a Git repository at runtime using a variable. For more details, refer to this page. You can also use HashiCorp Vault to fetch the secrets for Basic authentication type. Each secret is maintained as a key-value pair in Hashicorp Vault. To fetch the secrets from Vault you can enter the variables in the following format for User and Password (given you have selected the Use Vault checkbox) fields:
${Vault:<Key>}
Where, <Key> is the key in Hashicorp Vault that is defined for the field for which you want to fetch the secrets.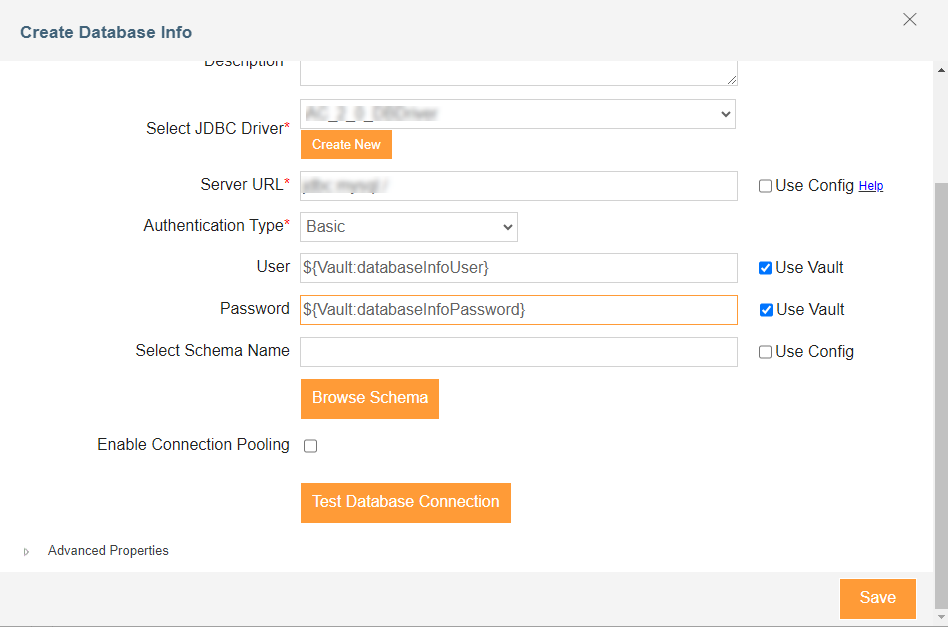
For more details refer to this page.
-
Enter the name of the schema in the Select Schema Name or click Browse Schema to browse the schema on the database whose connection you have just created.
While creating an activity, for example, an Advanced Database target, you can override the Schema you have used for this Database Info.
You can override the DB schema dynamically by defining a Process Flow variable/Transaction Parameter, Service.<DBInfoName>.Schema, and setting its value as the Schema that you want to use.If you select the Use Config checkbox, you can fetch the values from a Git repository at runtime using a variable. For more details, refer to this page. -
Select Enable Connection Pooling check box to enable database connection pooling.
-
Select a database connection pool in the Select Connection Pool field based on your requirement. The available options are Hikari and Universal Connection Pool (UCP).
-
Enter the maximum number of connections in the Maximum Connections text box that you want to keep in your connection pool at any time, default is 10.
If you enter 0 in the Maximum Connections text box then the activity will keep an unlimited number of connections in the connection pool. -
Enter the minimum number of connections in the Minimum Connections text box that you want to keep in your connection pool at any time, default is 3.
-
Enter the time in the Maximum Idle Time (seconds) text box. This field allows you to keep an ideal connection in the connection pool as per the time specified, default is 10.
-
Enter the time, in milliseconds, in the Maximum Wait Time When Exhausted (milliseconds) text box that you want the client to wait for a connection to be checked-in or acquired when the pool is exhausted.
If you enter 0 in the Maximum Wait Time When Exhausted (milliseconds) field then the client will wait indefinitely. -
Click Test Database Connection to verify the connection between Adeptia Connect and Database.
-
Expand Advanced Properties and select the project of the activity from the drop-down list of Project.
-
Click Save.