An XSL template is a customized template. If you need to perform a set of functions repeatedly, you can create an XSL template defining those functions, and then later call that XSL template whenever required. For example, if you need to perform the addition of two numbers at regular intervals, you can define the addition function in an XSL template. You can then call this XSL template whenever required.
The XSL Template option enables you to manage XSL templates. You can add, update, or delete an XSL template using this option. Once you have added an XSL template, you can use it to map elements. You can also define the scope of an XSL template while creating and saving it. The scope of an XSL Template is the context within which it is defined. An XSL template can be defined in any of the following scopes:
- Local: The XSL Templates defined within Local scope are available within the mapping activity, in which you have created the template.
- Global: The XSL Templates defined within the Global scope are available within all the mapping activities. Once you create a global template in a mapping activity, you can use it in all the mapping activities.
- Group: The XSL Templates defined within the Group scope are available only within the specific group.
- Project: The XSL Template can be defined to be a part of a project in the web mapper. A user can access the XSL template if he has access to that project.
This section describes how to create a new XSL Template right from scratch or by using existing XSL Template rules:
Creating an XSL Template
You can create an XSL template using:
- Textual Rule: Enables you to use the predefined mapping functions using Textual rule.
- XSL Rules: Enables you to define the XSL Template code to use the defined parameters.
Steps to Create an XSL template using the XSL Rules
-
In the Parameters panel, click Add Parameters icon and select XSL Templates from the list.
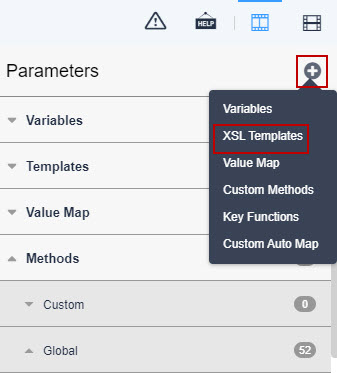 The Manage XSL Template screen is displayed.
 -
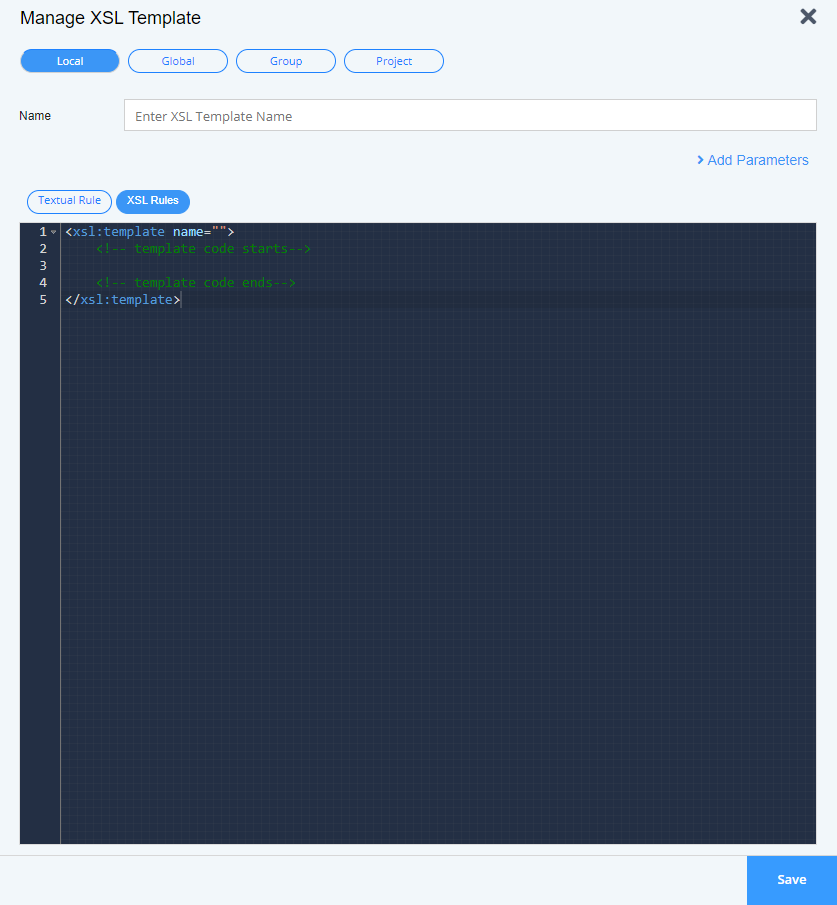
In the Name field, enter the name of the new XSL template you want to create. This displays the XSL tags in the XSL Template area.
-
Select the scope of the XSL Template. The default scope of an XSL Template is Local.

Select the Global button if you want to save the template as the Global Template. This will save the XSL template as a Global XSL template and can be used in any mapping activity. In the Parameters panel, the XSL template will be displayed under the folder hierarchy Templates/Global.
Select the Group button if you want to save the template within the current user group. This will save the XSL template as a Group XSL template and can be used in any mapping activity within the current user group. In the Parameters panel, the XSL template will be displayed under the folder hierarchy Templates/Group.
Select the Project if you want the XSL template to be a part of a project, for example, Default or say Project A. Once added to a project, GAC rules can be applied on that XSL template. A user having access to that project will be able to access the XSL templateYou cannot change the scope of an XSL Template once you have saved the XSL template as the respective buttons become inactive thereafter. -
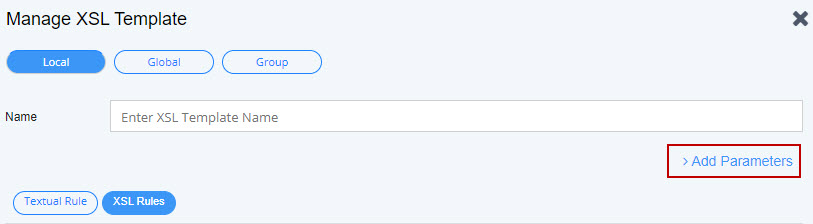
Click Add Parameters to add parameters for the new XSL template.
-
In the Name field, enter the name of the parameter you want to add. It also generates the corresponding XSL in the XSL Template Editor. You can add multiple parameters by following the steps 4 and 5. This will add a parameter row immediately next to the row which is currently selected.
If you need to delete any row, select the respective parameter row and click the Delete  icon. Click Yes to confirm, else click No.
You can also define variables as the parameters of the XSL Template. To add a global variable, refer to the section Using Global Variable. -
Enter the code for the function that you want to perform. For example, the syntax of the addition function would be as below: Enter this syntax in the XSL Template Editor. <xsl:value-of select ="$param1 + $param2"/> where: value-of is the syntax for the value to be returned param1 and param 2 are the defined parameters
-
Click Save.
On saving the template, XSL validation is performed. If XSL is invalid, then an alert message is displayed specifying the line number and reason for the error. -
In the Parameters panel, navigate to Templates and then Local. This displays the saved XSL Template with parameter details.
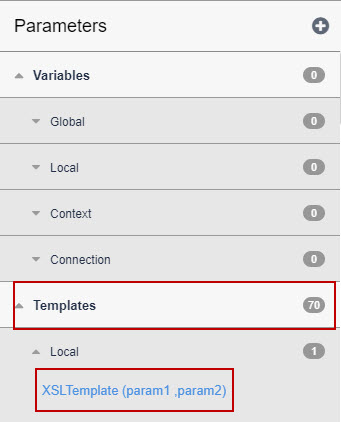
• You can edit, copy, and remove an XSL template from the Parameters Panel.
• Click Remove to remove the active XSL template.
Once you have created an XSL template, you can use it to map elements.
On the Manage XSL Template screen, by default the XSL Rules tab is selected. To create an XSL template using the Mapping Rules, click the Textual Rules.
Steps to create an XSL template using the Textual Rules
-
On the Manage XSL Templatescreen, click the Textual Rules button.
-
In the Name field, enter the name of the new XSL template you want to create.
-
Select the scope of the XSL Template. The default scope of the XSL template is Local.
-
Click Add Parameters to add parameters for the new XSL template.
-
In the Name field, enter the name of the parameter you want to add. It also generates the corresponding XSL in the XSL Template area.
-
You can add multiple parameters by following the steps 4 and 5. This will add a parameter row immediately next to the row which is currently selected.
If you need to delete any row, select the respective parameter row and click the Delete icon. Click Yes to confirm, else click No. -
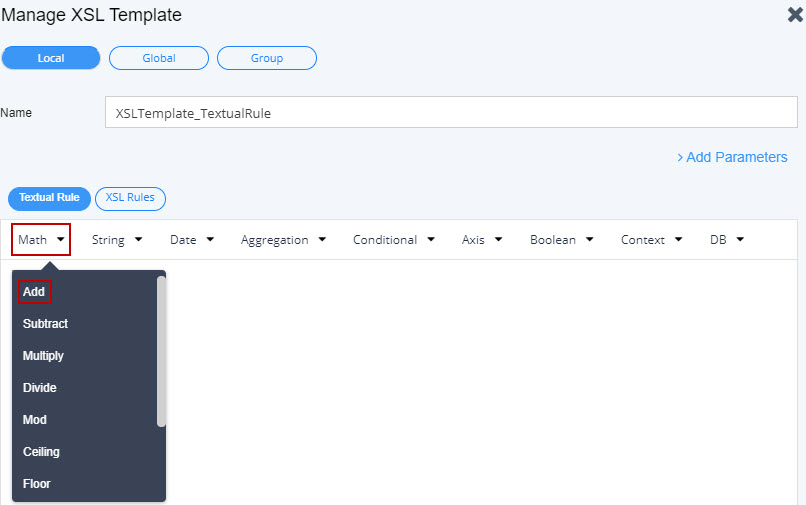
Select the required Mapping Function. For example, select the mapping function, Math > Add.
-
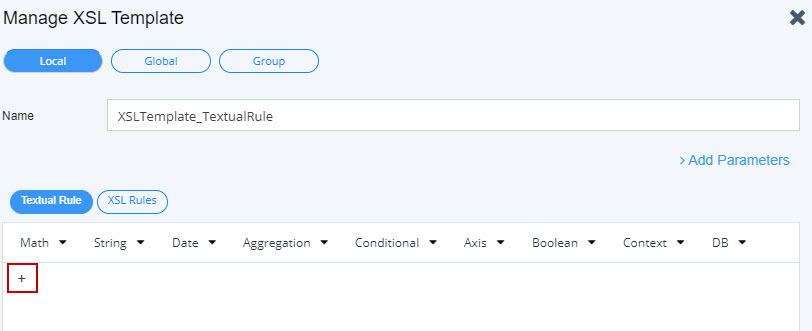
The respective mapping function (add symbol for this example) is displayed in the XSL Template Editor.
-
Use the parameters that you have added in the previous steps.
If you need to delete any row, select the respective row and click the Deleteicon. -
Click the Save button to save the Local XSL template.
-
In the Parameters panel, navigate to Templates and then Local. This displays the saved XSL Template with parameter details.
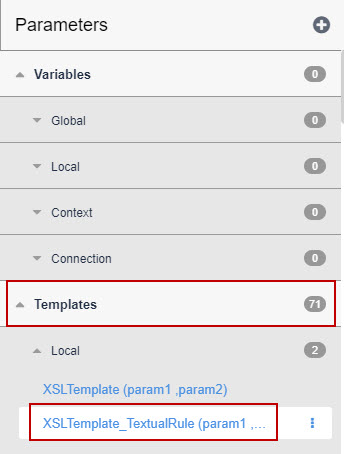
You can edit, copy, and remove an XSL template from the Parameters Panel.
Creating a new XSL Template using the Copy function
You can use the copy function to create a new XSL Template based on existing XSL template rules.
Follow the steps below to use this function:
- In the Parameters panel, click
 icon of an existing Template and select Copy.
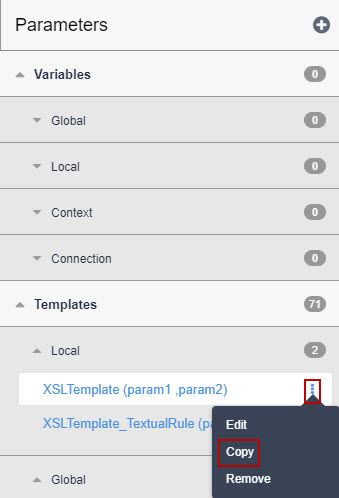 This displays the Edit Local XSL Template screen.
2. The new XSL Template bears the name of the copied XSL Template with the suffix '_Copy'.
This displays the Edit Local XSL Template screen.
2. The new XSL Template bears the name of the copied XSL Template with the suffix '_Copy'.
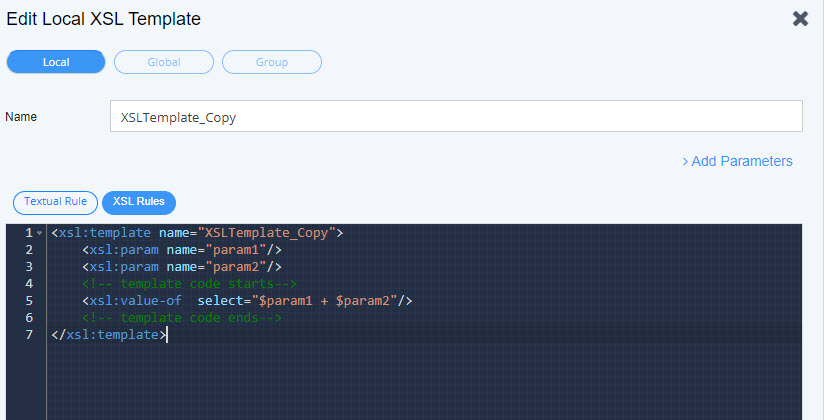 You can edit and rename the copied XSL Template.
3. Click the Save button to save the Local XSL template.
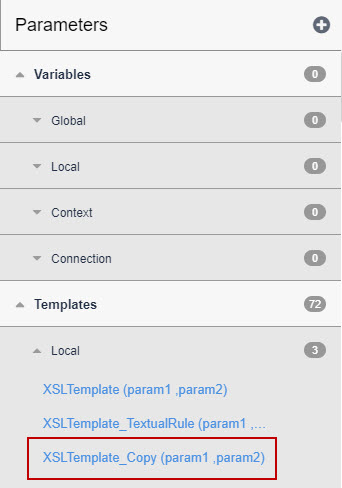
4. In the Parameters panel, navigate to Templates and then Local. This displays the saved XSL Template with parameter details.
You can edit and rename the copied XSL Template.
3. Click the Save button to save the Local XSL template.
4. In the Parameters panel, navigate to Templates and then Local. This displays the saved XSL Template with parameter details.
 | Click the More option icon of an existing XSL Template and select the View Dependencies option to see where all this XSL template is being used. |
|---|
You may be interested in...